Thursday, September 5, 2013

Setup Remote Access Key cPanel Server WHM

Setup Remote Access Key

For WHM version 11.36 
(Home >> Cluster/Remote Access >> Setup Remote Access Key
This feature can be used to generate an access key. This access key can be used for automatic account creation scripts, external billing software, and allowing servers in your DNS cluster to exchange records. 
To generate a new access key: 
  1. Login to your_cpanel_server.com:2087 (example)
  2. Go to: Home>>Cluster/Remote Access>>Setup Remote Access Key
  3. Click Generate New Key.
  4. Copy and paste the new access key to the appropriate file on the remote server(s) that need to communicate with your web server. To use the remote access key to configure a DNS server cluster, follow our steps for configuring a cluster, pasting the key in on the Create Trust Relationshipscreen.

ACCESS HASH AUTHENTICATION

You can write your script so that it includes an access hash, or "key," in the HTTP header that it sends to the server when it calls the API function. This method is only available to WHM users. 
The access hash can be set up, and subsequently accessed, from the WHM Setup Remote Access Key feature. On your server, the hash resides in/root/.accesshash.

Install Jboss 5.1.0.GA to Windows 7

Today I am going to show you how to install Jboss 5.1.0.GA on  a Windows 7 machine.
1. First of all download the binaries from http://www.jboss.org/jbossas/downloads/
2. The downloaded file is a zip is named jboss-5.1.0.GA-jdk6.zip. As you can see it is a zip archive and not an executable.
3. Create an installation folder (I created one at C:\Program Files\Jboss) and extract the archive there.
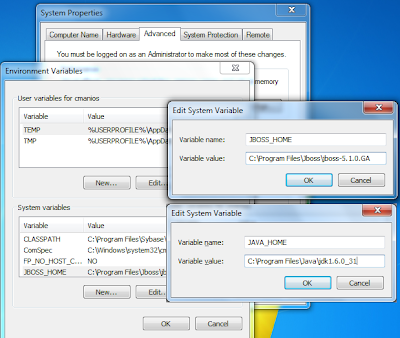
4. Add the path to JBoss directory to JBOSS_HOME enviroment variable (picture 1). For me it is C:\Program Files\Jboss\jboss-5.1.0.GA


5. Add the path to JDK directory to JAVA_HOME enviroment variable (picture 1). For me it is C:\Program Files\Java\jdk1.6.0_31
6. Gongratulations! We are ready! Now to start the application server open a shell window using WinKey + R then type cmd and hit Enter.
7. Type
C:\Program Files\Jboss\jboss-5.1.0.GA\bin\run.bat  -b 0.0.0.0
Notice the parameter -b! This parameter assures that server isvisible from all computers inside the network.
7. If you want to see if the application server has started correctly, inspect the log output in the shell will it is loading. When the process is finished open a browser and type: http://localhost:8080/web-console/

Heap size for JVM - Invalid initial heap size

Two JVM options are often used to tune JVM heap size: -Xmx for maximum heap size, and -Xms for initial heap size. Here are some common mistakes made by developers while using them:
  1. Missing m, M, g or G at the end (they are case insensitive). For example,

    java -Xmx128 BigApp
    java.lang.OutOfMemoryError: Java heap space
    
    The correct command should be: java -Xmx128m BigApp. To be precise, -Xmx128 is a valid setting for very small apps, like HelloWorld. But in real life, I guess you really mean -Xmx128m
  2. Extra space in JVM options, or incorrectly use =. For example,

    java -Xmx 128m BigApp
    Invalid maximum heap size: -Xmx
    Could not create the Java virtual machine.
    
    java -Xmx=512m HelloWorld
    Invalid maximum heap size: -Xmx=512m
    Could not create the Java virtual machine.
    
    The correct command should be java -Xmx128m BigApp, with no whitespace nor =. -X options are different than -Dkey=value system properties, where = is used.
  3. Only setting -Xms JVM option and its value is greater than the default maximum heap size, which is 64m. The default minimum heap size seems to be 0. For example,

    java -Xms128m BigApp
    Error occurred during initialization of VM
    Incompatible initial and maximum heap sizes specified
    
    The correct command should be java -Xms128m -Xmx128m BigApp. Its a good idea to set the minimum and maximum heap size to the same value. In any case, dont let the minimum heap size exceed the maximum heap size.
  4. Heap size is larger than your computers physical memory. For example,

    java -Xmx2g BigApp
    Error occurred during initialization of VM
    Could not reserve enough space for object heap
    Could not create the Java virtual machine.
    
    The fix is to make it lower than the physical memory: java -Xmx1g BigApp
  5. Incorrectly use mb as the unit, where m or M should be used instead.

    java -Xms256mb -Xmx256mb BigApp
    Invalid initial heap size: -Xms256mb
    Could not create the Java virtual machine.
http://avdheshsemwal.blogspot.com/2013/02/heap-size-for-jvm.html

Wednesday, September 4, 2013

Concat two different fields in cakephp in find statement

<?php
$this
->ModelName->virtualFields = array(
    
'full_name' => "CONCAT(ModelName.first_name, ' ', ModelName.last_name)"

);
$list $this->ModelName->find("all", array(
    
"fields" => array(
        
"ModelName.id",
        
"ModelName.full_name"
    
)
));

?>

Concatenate/concat/group_concat two columns/rows with MySQL query

Two/more rows concatenate-
You can use GROUP_CONCAT.
As in:
select person_id, group_concat(hobbies separator ', ')
    from peoples_hobbies group by person_id;
Death: As Dag stated in his comment, there is a 1024 byte limit on result. to solve this run this query before your query:
set group_concat_max_len=2048
Off course, you can change 2048 accourding to your needs.

Two/more columns concatenate-
You can use the CONCAT function like this:
SELECT CONCAT(SUBJECT, ' ', YEAR) FROM table

MySql cast or convert data(integer, float, double, decimal, date, etc...) as character/string

Fiddle link

You will need to cast or convert as a CHAR datatype, there is no varchar datatype that you can cast/convert data to:
select CAST(id as CHAR(50)) as col1 from t9;

select CONVERT(id, CHAR(50)) as colI1 from t9;
select CAST(amount AS DECIMAL(10, 2)) AS amount FROM t9; 

Monday, September 2, 2013

PayPal IPN/Hosted payment with PHP

Create a PayPal Sandbox Account

If you have not done so already, you should have a PayPal Sandbox account setup with two test accounts, one as a test buyer and one as a test seller. The sandbox allows you to test transactions and IPN processing without having to perform live transactions. Follow the instructions in the Sandbox User Guide to setup your accounts or view IPN Guid. 

Creating a Business test account:

The Sandbox automatically creates your first Business test account when you sign-up for a Developer account on developer.paypal.com. PayPal generates the test Business account name by appending -facilitator to your email name, and the account is assigned a set of Classic test API credentials that you can use to create mock PayPal transactions in the Sandbox.
To test Classic API calls, use test Business account values along with values from a Personal test account that you create (as described in Creating a Personal test account).
Some PayPal calls involve more than a single buyer and seller pair. In the testing phase, you need to create all the test accounts needed to fulfill the user entities that partake in your PayPal transactions. For example, parallel payment calls and Adaptive calls each require two different Business accounts, but for different reasons. In these cases, you need to create additional Business test accounts to play the roles of the entities in your transactions.
For more information on the different test account roles, see Planning your Test Accounts.

Accepting credit cards in test transactions


To use a credit card as a payment method in your test transactions, you must configure a test Business account as a PayPal Payments Pro account:
  1. Create a test Business account.
  2. Navigate to the Profile page of the Business account and click the Upgrade to Pro link.
  3. Click Enable on the resulting screen.
Tip  Once you enable PayPal Payments Pro for a test Business account, the setting is permanent and you cannot undo the configuration for that account. We recommend you create multiple Business test accounts with various settings in order to test all the variations you might need to handle with your application.

Getting your API test credentials


All PayPal API requests require API credentials to verify the call is being made through a valid PayPal account. Calls to the Sandbox environment are no different, but they require that you use the test credentials assigned to one of your Sandbox Business accounts. For details on the credentials you need for a specific API call, refer to the API Reference for the PayPal operation(s) you’re using.
The Sandbox assigns each Business account a set of Classic API test credentials. Get your test credentials by navigating to the Profile > API credentials tab of the Business account you want to use in your request:


Create a html file to show form as follows:

<!-- LIVE URL=https://www.paypal.com/cgi-bin/webscr -->
<!-- TEST URL=https://www.sandbox.paypal.com/cgi-bin/webscr -->
<form method="post" action="https://www.sandbox.paypal.com/cgi-bin/webscr">
<input type="hidden" name="cmd" value="_xclick"/>
<input type="hidden" name="business" value="pritomkucse@gmail.com"/>
<input type="hidden" name="currency_code" value="USD"/>
<input type="hidden" name="item_name" value="Payment for Order100"/>
<input type="hidden" name="item_number" value="100"/>
<input type="hidden" name="amount" value="100.00"/>
<input type="hidden" name="zip" value="2102"/>
<input type="hidden" name="return" value="http://domain.com/return.php"/>
<input type="hidden" name="notify_url" value="http://domain.com/process.php"/>
<input type="submit" value="Pay"/>
</form>

Now create process.php as follows:
 

$TEST_MODE = true;

// STEP 1: read POST data
$myPost = array();
foreach ($_POST as $key => $val) {
  $myPost[$key] = $val;
}
if(count($myPost) > 0) {
    // read the IPN message sent from PayPal and prepend 'cmd=_notify-validate'
    $req = 'cmd=_notify-validate';
    if(function_exists('get_magic_quotes_gpc')) {
        $get_magic_quotes_exists = true;
    } 
    foreach ($myPost as $key => $value) {        
        if($get_magic_quotes_exists == true && get_magic_quotes_gpc() == 1) { 
            $value = urlencode(stripslashes($value)); 
        } else {
            $value = urlencode($value);
        }
        $req .= "&$key=$value";
    }
    // Step 2: POST IPN data back to PayPal to validate
    $ch = curl_init('https://www.paypal.com/cgi-bin/webscr');
    curl_setopt($ch, CURLOPT_HTTP_VERSION, CURL_HTTP_VERSION_1_1);
    curl_setopt($ch, CURLOPT_POST, 1);
    curl_setopt($ch, CURLOPT_RETURNTRANSFER,1);
    curl_setopt($ch, CURLOPT_POSTFIELDS, $req);
    /* Un-comment the following line when using in live mode */
    //curl_setopt($ch, CURLOPT_SSL_VERIFYPEER, 1);
    /* Comment the following line when using in live mode */
    curl_setopt($ch, CURLOPT_SSL_VERIFYPEER, false);
    curl_setopt($ch, CURLOPT_SSL_VERIFYHOST, 2);
    curl_setopt($ch, CURLOPT_FORBID_REUSE, 1);
    curl_setopt($ch, CURLOPT_HTTPHEADER, array('Connection: Close'));
    if( !($res = curl_exec($ch)) ) {
        echo ("Got " . curl_error($ch) . " when processing IPN data");
        curl_close($ch);
        exit;
    }
    curl_close($ch);
    // inspect IPN validation result and act accordingly
    if (strcmp ($res, "VERIFIED") == 0 || $TEST_MODE) {
        // The IPN is verified, process it:
        // check whether the payment_status is Completed
        // check that txn_id has not been previously processed
        // check that receiver_email is your Primary PayPal email
        // check that payment_amount/payment_currency are correct
        // process the notification
        // IPN message values depend upon the type of notification sent.
        // To loop through the &_POST array and print the NV pairs to the screen:
        foreach($_POST as $key => $value) {
          echo $key." = ". $value."<br>";
        }
    } else if (strcmp ($res, "INVALID") == 0) {
        // IPN invalid, log for manual investigation
        echo "The response from IPN was: <b>" .$res ."</b>";
    }
    return;
}

Output will be something like this if verified or use test mode


mc_gross = 100.00
protection_eligibility = Eligible
address_status = confirmed
payer_id = 2WA3LGLDXB2KQ
tax = 0.00
address_street = 1 Main St
payment_date = 06:19:41 Mar 31, 2014 PDT
payment_status = Completed
charset = windows-1252
address_zip = 95131
first_name = pritomkucse
mc_fee = 3.20
address_country_code = US
address_name = pritomkucse pritomkucse
notify_version = 3.7
custom = 
payer_status = verified
business = pritomkucse@gmail.com
address_country = United States
address_city = San Jose
quantity = 1
payer_email = pritomkucse200@gmail.com
verify_sign = AFcWxV21C7fd0v3bYYYRCpSSRl31AR242OK8FeXkiwjD5hZ5C9sCiKea
txn_id = 9W334245KE956841G
payment_type = instant
last_name = pritomkucse
address_state = CA
receiver_email = pritomkucse@gmail.com
payment_fee = 3.20
receiver_id = GMMFRVHKPYGGG
txn_type = web_accept
item_name = Payment for Order100
mc_currency = USD
item_number = 100
residence_country = US
test_ipn = 1
handling_amount = 0.00
transaction_subject = 
payment_gross = 100.00
shipping = 0.00
auth = Adp..e2JobuposYLNuFxaf24yXSCLj65T4NRjjTYGlW4NwGsFhhT6buQBNhlJyh1RDz6rCb-zHxuG-eEiDlR8Og