|
Monday, January 16, 2023
Few Tools That I Badly Need In My Daily Life


Wednesday, January 11, 2023
How to Use .gitconfig's includeIf - Git 2.13 conditional config on windows - git set username and email for separate project - Is it possible to have different Git configuration for different projects?
|
.gitconfig is usually stored in the user.home directory. I use a different identity to work on projects for Company A and something else for Company B (primarily the name / email). How can I have two different Git configurations so that my check-ins don't go with the name / email? |
| As of git version 2.13, git supports conditional configuration includes. In this example we clone Company A's repos in global directory anywhere in my computer, and Company B's repos in some other specific folder like D:/Mine/Projects. For company B, we will keep all our repo's inside D:/Mine/Projects |
File Location For Windows : "C:\Users\${USER_NAME}\.gitconfig", follow below steps to make it work:
|

How to fix - git@github.com permission denied (publickey). fatal could not read from remote repository and Support for password authentication was removed. Please use a personal access token instead - Git: How to solve Permission denied (publickey) error when using Git - Fix "Permission denied (publickey)" error when pushing with Git
|
So, the problem arised when I tried to clone a Git repository from github using below command: git clone git@github.com:user-name/repo-name.git But I failed with below error: Cloning into 'repo-name'... The authenticity of host 'github.com (20.205.243.166)' can't be established. ECDSA key fingerprint is SHA256:p2QAMXNIC1TJYWeIOttrVc98/R1BUFWu3/LiyKgUfQM. Are you sure you want to continue connecting (yes/no/[fingerprint])? yes Warning: Permanently added 'github.com,20.205.243.166' (ECDSA) to the list of known hosts. git@github.com: Permission denied (publickey). fatal: Could not read from remote repository. Please make sure you have the correct access rights and the repository exists. |
|
Possible solution is Create SSH key pair The process is as below: |
|
1. Open Git Bash and run command ssh-keygen -t rsa -b 4096 -C "your_email@example.com" 2. Accepts the default file location (using Enter key) 3. Set SSH key passphrases or hit Enter button twice - will generate private and public key.  5. Copy the SSH key to your clipboard using command clip < /c/Users/HP/.ssh/id_rsa.pub. 6. Time to set key to github account, go to https://github.com/settings/profile 7. Then go to SSH and GPG keys and click on New SSH key button and paste SSH key to the big text box (Make sure you remove your email address from SSH key at end):   9. Now you can clone your GitHub repo and it will not complain about git@github.com permission denied (publickey). fatal could not read from remote repository |
|
10. It's time to try again to clone repo using Git Bash. 11. Execute command git clone git@github.com:user-name/repo-name.git and let's see what happen 12. So it's done, repo clonned successfully:  |
Benefits of this approach
|
Monday, January 9, 2023
How to resolve laravel ui in Laravel Framework 7.29.3
|
I am currently using laravel 7.29.3 . i want install laravel ui auth using below command composer require laravel/ui php artisan ui bootstrap --auth |
Problem 1 - Conclusion: remove laravel/framework v7.29.3 - Conclusion: don't install laravel/framework v7.29.3 - laravel/ui 3.x-dev requires illuminate/filesystem ^8.0 -> satisfiable by illuminate/filesystem[8.x-dev, v8.0.0, v8.0.1, v8.0.2, v8.0.3, v8.0.4, v8.1.0, v8.10.0, v8.11.0, v8.11.1, v8.11.2, v8.12.0, v8.12.1, v8.12.2, v8.12.3, v8.13.0, v8.2.0, v8.3.0, v8.4.0, v8.5.0, v8.6.0, v8.7.0, v8.7.1, v8.8.0, v8.9.0]. - laravel/ui v3.1.0 requires illuminate/filesystem ^8.0 -> satisfiable by illuminate/filesystem[8.x-dev, v8.0.0, v8.0.1, v8.0.2, v8.0.3, v8.0.4, v8.1.0, v8.10.0, v8.11.0, v8.11.1, v8.11.2, v8.12.0, v8.12.1, v8.12.2, v8.12.3, v8.13.0, v8.2.0, v8.3.0, v8.4.0, v8.5.0, v8.6.0, v8.7.0, v8.7.1, v8.8.0, v8.9.0]. - don't install |
|
In such case we should determine version of laravel/ui package to be satiable with our laravel application's version using this command composer require laravel/ui "^2.1" --dev Or you can use this too: composer require laravel/ui:^2.4 then php artisan ui bootstrap --auth |
Composer require runs out of memory. PHP Fatal error: Allowed memory size of 1610612736 bytes exhausted
To get the current memory_limit value, run: php -r "echo ini_get('memory_limit').PHP_EOL;" Try increasing the limit in your php.ini file (ex. C:\xampp\php\php.ini for Windows-like systems): ; Use -1 for unlimited or define an explicit value like 2G memory_limit = -1 Or, you can increase the limit with a command-line argument: php -d memory_limit=-1 composer.phar require hwi/oauth-bundle php-http/guzzle6-adapter php-http/httplug-bundle |
Saturday, January 7, 2023
Laravel - Create new Project from Specific Version - Create Laravel Project for Version 6.X
| It's very simple to install specific version if Laravel - for my case it's 6. |
|
I usually use Git Bash to install Laravel. First open Git Bash and navigate to your directory where you want to install Laravel. Then Run below command to check PHP version first, you can check which PHP version is suitable for Laravel 6.X.
Then run command composer create-project --prefer-dist laravel/laravel app2 "6.20.*" will create a project for Laravel version 6.X. |
Screenshot available:  |
WordPress - Add a custom menu item to the WordPress admin menu, for a user with administrator capability - Using WordPress Plugin development
| You have to create a plugin first, say create a directory named "plugin1" under "wp-content/plugins" directory. Create a file named "plugin1.php" using following content: |
<?php /** * Plugin Name: plugin1 * Plugin URI: https://www.your-site.com/ * Description: Test. * Version: 1.0.1 * Author: Plugin Owner Name * Author URI: https://www.your-site.com/ **/ function register_my_custom_menu_page() { add_menu_page( __( 'Custom Menu Title', 'textdomain' ), 'Custom Menu', 'manage_options', 'plugin1/home.php', '', plugins_url( 'plugin1/images/home2.png' ), 6 ); } // This command will add menu at left bar of admin panel add_action( 'admin_menu', 'register_my_custom_menu_page' ); // This will add stylesheet wp_enqueue_style( 'plugin1.main.css', plugins_url( 'plugin1/main.css' ), false, '1.1', 'all'); |
Create an directory inside that directory "images" and put an image which will appear as menu icon in the admin menu panel, my structure is like as:
 |
Go to "http://localhost/plugin-development/wp-admin/plugins.php" to activate your Plugin. Above code will add a left menu with icon to the menubar as below: 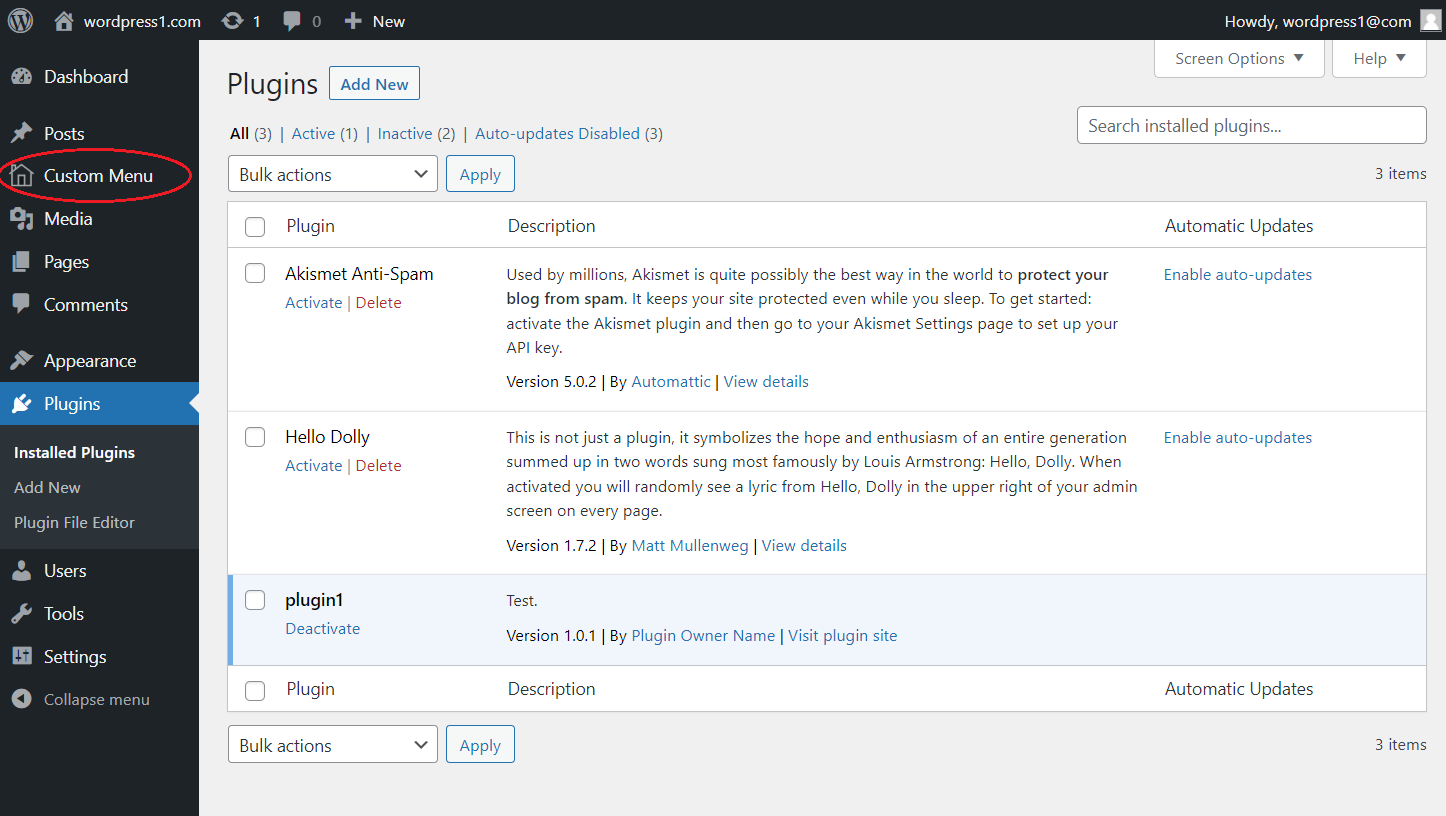 |
Once you click on the menu item, it will take you to the "plugin1/home.php" page which will looks like below:  |
Subscribe to:
Posts (Atom)