| Laravel Mix allows you to use a single line to describe what you want and it'll use it's preconfigured settings to process it properly. |
| Most of our time will be spent in the webpack.mix.js file. In the file, we can configure all we need to do to set public path and we can also set js file location for chunk js files when we use Suspense and lazy for dynamic js loading for per route. |
| There are several more Mix methods and you can set all of them in the default webpack.mix.js file. |
// Full API
    // mix.js(src, output);
    // mix.react(src, output); <-- Identical to mix.js(), but registers React Babel compilation.
    // mix.extract(vendorLibs);
    // mix.sass(src, output);
    // mix.standaloneSass('src', output); <-- Faster, but isolated from Webpack.
    // mix.fastSass('src', output); <-- Alias for mix.standaloneSass().
    // mix.less(src, output);
    // mix.stylus(src, output);
    // mix.postCss(src, output, [require('postcss-some-plugin')()]);
    // mix.browserSync('my-site.dev');
    // mix.combine(files, destination);
    // mix.babel(files, destination); <-- Identical to mix.combine(), but also includes Babel compilation.
    // mix.copy(from, to);
    // mix.copyDirectory(fromDir, toDir);
    // mix.minify(file);
    // mix.sourceMaps(); // Enable sourcemaps
    // mix.version(); // Enable versioning.
    // mix.disableNotifications();
    // mix.setPublicPath('path/to/public');
    // mix.setResourceRoot('prefix/for/resource/locators');
    // mix.autoload({}); <-- Will be passed to Webpack's ProvidePlugin.
    // mix.webpackConfig({}); <-- Override webpack.config.js, without editing the file directly.
    // mix.then(function () {}) <-- Will be triggered each time Webpack finishes building.
    // mix.options({
    //   extractVueStyles: false, // Extract .vue component styling to file, rather than inline.
    //   processCssUrls: true, // Process/optimize relative stylesheet url()'s. Set to false, if you don't want them touched.
    //   purifyCss: false, // Remove unused CSS selectors.
    //   uglify: {}, // Uglify-specific options. https://webpack.github.io/docs/list-of-plugins.html#uglifyjsplugin
    //   postCss: [] // Post-CSS options: https://github.com/postcss/postcss/blob/master/docs/plugins.md
    // });
|
| Below is the code snippet which will define js file location for chunk js files: |
const mix = require('laravel-mix'); /* |-------------------------------------------------------------------------- | Mix Asset Management |-------------------------------------------------------------------------- | | Mix provides a clean, fluent API for defining some Webpack build steps | for your Laravel application. By default, we are compiling the Sass | file for the application as well as bundling up all the JS files. | */ mix.react('resources/js/app.js', 'public/js') .sass('resources/sass/app.scss', 'public/css'); mix.webpackConfig({ output: { // Directory for junk files to {ROOT_DIR}/public/js chunkFilename: 'js/[name].js', }, }); |
Saturday, March 14, 2020
Laravel-mix Webpack Public Path | Set custom path for chunk files | Using Laravel Mix with webpack for All Your Assets
Thursday, March 12, 2020
React Component on Window Resize Event
| React doesn't have a resize event integrated into it, but we can listen to the native browser window resize event from within our React component. We will attach window resize event into componentDidMount method. |
| Under normal conditions, React will re-render a component when its props or state changes. To trigger a re-render of Component in the example, we'll set internal state on the component when the event is fired. So we can set/update state variable to tell React Component to update. We can implement method componentDidUpdate to acknoledged something changed. |
| When adding an event listener, such as we are for the resize event, we should make sure to clean up after ourselves. We will clean up any type of listener we added into method componentWillUnmount. |
| Example code given below: |
import React from "react";
import "./styles.css";

class App extends React.Component {
  constructor() {
    super();

    // we will update below state variables to tell react component
    // to update, only state or props change can update react component
    this.state = {
      width: 0,
      height: 0
    };

    // we will use this timer to less fire resize event
    // practially we will fire resize event 500 miliseconds after
    this.timer = null;

    // we will catch windows resize event into below function
    this.windowResized = this.windowResized.bind(this);

    // we will handle resize event so resize event will
    // be in some time interval, less freequent
    this.updateWindowWidth = this.updateWindowWidth.bind(this);
  }

  componentDidMount() {
    window.addEventListener("resize", this.windowResized);
    this.updateWindowWidth();
  }

  componentDidUpdate() {
    console.log(
      `Window width/height changed to ${this.state.width}X${this.state.height}`
    );
  }

  componentWillUnmount() {
    window.removeEventListener("resize", this.windowResized);
  }

  updateWindowWidth() {
    let _this = this;
    setTimeout(function() {
      _this.setState({
        width: window.innerWidth,
        height: window.innerHeight
      });
    });
  }

  windowResized() {
    let _this = this;
    if (this.timer) {
      clearTimeout(this.timer);
    }
    this.timer = setTimeout(function() {
      _this.updateWindowWidth();
    }, 500);
  }

  render() {
    return (
      <div className="App">
        <h1>
          WIDTH={this.state.width} HEIGHT={this.state.height}
        </h1>
      </div>
    );
  }
}

export default App;
|
Sample Image: 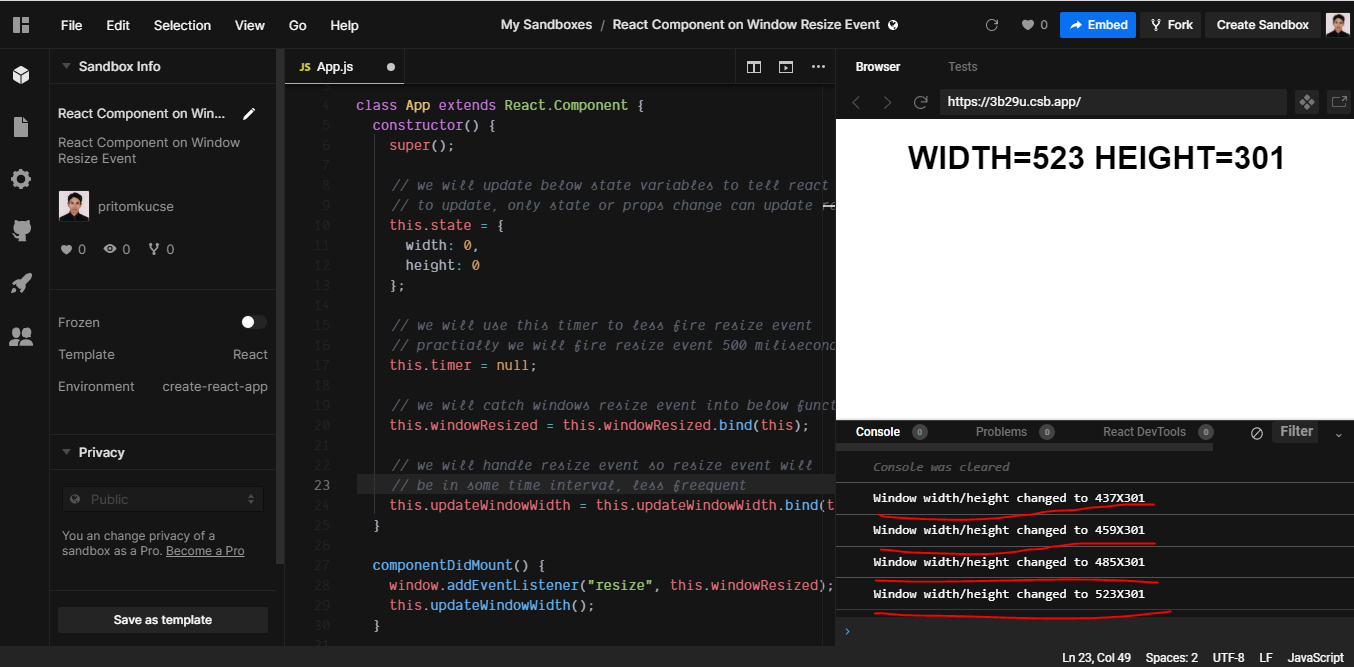 |
|
Live Example: https://codesandbox.io/s/react-component-on-window-resize-event-3b29u |
Saturday, March 7, 2020
Lazy Loading React Components (with react.lazy and suspense)
|
Our first step is to create an React application using below command: npm init react-app react-lazy-loading-component Navigate to project folder and type npm start to start project on browser. Make sure you execute command npm run build to prepare build script which will be deployed on server  |
|
Route-based code splitting You have to install react-router-dom using npm install --save react-router-dom to use this functionality. Deciding where in your app to introduce code splitting can be a bit tricky. You want to make sure you choose places that will split bundles evenly, but won’t disrupt the user experience. A good place to start is with routes. Most people on the web are used to page transitions taking some amount of time to load. You also tend to be re-rendering the entire page at once so your users are unlikely to be interacting with other elements on the page at the same time. |
Sample App.js import {BrowserRouter as Router, Route, Switch} from 'react-router-dom'; import React, {Suspense, lazy} from 'react'; import './App.css'; import Header from './Header'; const Home = lazy(() => import('./Home')); const AnotherHome = lazy(() => import('./AnotherHome')); function App() { return ( <div> <Router> <Header/> <div className="container"> <Suspense fallback={<div>Loading...</div>}> <Switch> <Route exact path="/" component={Home}/> <Route exact path="/another-home" component={AnotherHome}/> </Switch> </Suspense> </div> </Router> </div> ); } export default App; |
| Actually use of Suspense and Lazy will load components chunk by chunk when they needed, and once a component loaded into browser will not load second time. |
 |
| GitHub Link https://github.com/pritomkucse/react-lazy-loading-component |
|
Live Example at codesandbox.io https://codesandbox.io/s/lazy-loading-react-components-with-reactlazy-and-suspense-2hx75 Make sure you see console to ensure that suspense callback working as expected:  |
Subscribe to:
Posts (Atom)