| Since a long time, Visual Basic and Visual Studio have Crystal report with it. People are saying that since 1993. But in VS2010, they excluded Crystal reports. Yes, what you just heard is right, Crystal Report has been dropped from Visual Studio 2010. But don't worry, it is available as a separate download from the SAP web site. These are the things that I found from the internet. And now I am going to use VS2015 |
| First need to create an project. Then need to create Crystal Report as below: |
    |
| Below image is for sub report: |
 |
| Below image is showing how to insert an Sub Report to Main Report: |
 |
| Below image is for our DataSet, as we are not using DataBase: |
using CrystalDecisions.CrystalReports.Engine; using CrystalDecisions.Shared; using System.Data; using System.IO; using System.Web.Mvc; namespace WebApplication1.Controllers { public class MyController : Controller { private ReportDocument report = new ReportDocument(); // GET: My public ActionResult Index() { return View("View1"); } public ActionResult Export() { ReportDocument rd = new ReportDocument(); rd.Load(Path.Combine(Server.MapPath("~/Reports/CrystalReport1.rpt"))); DataTable dataTable = new DataTable(); dataTable.Columns.Add("Id"); dataTable.Columns.Add("Name"); dataTable.Columns.Add("Roll"); for (int index = 1; index <= 10; index++) { DataRow r = dataTable.NewRow(); r["Id"] = index; r["Name"] = "Name - " + index; r["Roll"] = "Roll - " + index; dataTable.Rows.Add(r); } rd.Database.Tables["DataTable1"].SetDataSource((DataTable)dataTable); dataTable = new DataTable(); dataTable.Columns.Add("SchoolName"); dataTable.Columns.Add("ExamYear"); dataTable.Columns.Add("Class"); DataRow r2 = dataTable.NewRow(); r2["SchoolName"] = "My School"; r2["ExamYear"] = "2008/2009"; r2["Class"] = "Class 9"; dataTable.Rows.Add(r2); rd.Database.Tables["SingleData"].SetDataSource((DataTable)dataTable); Response.Buffer = false; Response.ClearContent(); Response.ClearHeaders(); Stream stream = rd.ExportToStream(ExportFormatType.PortableDocFormat); stream.Seek(0, SeekOrigin.Begin); return File(stream, "application/pdf", "My.pdf"); } } } |
| Below is sample output: |
 |
| You can download source code from here |
Sunday, December 30, 2018
Generate a Report using Crystal Reports in Visual Studio 2015, C# Crystal Reports without database, C# Crystal Reports with Sub Report, C# Crystal Reports using DataSet and DataTable, C# Crystal Reports using Strongly Typed DataSet
Saturday, December 1, 2018
Android How to create Buttons of equal width in a row on any Screen width | How to implement linearlayout with 2 buttons, Horizontal and Vertical | Set two buttons to same width regardless of screen size
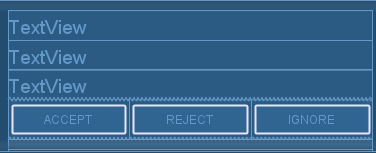
| It is a common requirement to layout a bunch of buttons side by side. Making them of equal width is just plain good GUI design. |
| To achieve the effect above, first create a LinearLayout just for the buttons. The layout will contain three buttons. |
<LinearLayout android:id="@+id/linearLayout1" android:layout_height="wrap_content" android:layout_width="fill_parent"> <Button android:id="@+id/button_accept" android:text="Accept" android:layout_weight="1" android:layout_height="40sp" android:layout_width="0dp"/> <Button android:id="@+id/button_reject" android:text="Reject" android:layout_weight="1" android:layout_height="40sp" android:layout_width="0dp"/> <Button android:id="@+id/button_ignore" android:text="Ignore" android:layout_weight="1" android:layout_height="40sp" android:layout_width="0dp"/> </LinearLayout> |
|
We took these steps to get the effect: 1. For the LinearLayout we set android:layout_width="fill_parent". This causes the layout view to take up the full width available from the device. 2. For each Button, we set android:layout_width="fill_parent" and android:layout_weight="1". |
 |
Subscribe to:
Posts (Atom)