| By default and for some reason, mysql 8 default plugin is auth_socket. Applications will most times expect to log in to your database using a password. |
|
If you have not yet already changed your mysql default authentication plugin, you can do so by: 1. Log in as root to mysql 2. Run this sql command: ALTER USER 'root'@'localhost' IDENTIFIED WITH mysql_native_password BY 'password'; |
| Replace 'password' with your root password. In case your application does not log in to your database with the root user, replace the 'root' user in the above command with the user that your application uses. |
Saturday, February 29, 2020
Laravel Migrations with MySQL 8.0.x - How to resolve the error: SQL authentication method unknown in Laravel-MySql
Windows Command Prompt - Change the default Command Prompt directory
| The change requires you to modify a value in the Registry. To do so press the Windows and R key at the same time to open up the run box on the system. Type in regedit and tap on the enter key on the keyboard to load the Registry Editor. You may receive an UAC prompt on newer versions of the operating system which you need to accept before the Registry Editor opens up. |
|
Navigate to the key HKEY_CURRENT_USER\Software\Microsoft\Command Processor and search for the String Autorun in the right window.If you can't find the parameter there right-click on Command Processor and select New > String. Name the string Autorun and click ok. Now double-click the new Autorun entry that you find on the right and enter the following string (as example). C:\Users\PRITOM\Desktop\MINE |

|
MySQL Installation With Error: Microsoft Visual C++ 2019 Redistributable Package (x64) is not installed. Latest binary compatible version will be installed if agreed to resolve this requirement.
| Microsoft Visual C++ 2019 Redistributable Package (x64) is not installed. Latest binary compatible version will be installed if agreed to resolve this requirement. |
| You need to download latest Microsoft Visual C++ Redistributable Package to resolve the problem. |
| You can download latest one from https://www.microsoft.com/en-us/download/details.aspx?id=48145 |
Tuesday, February 25, 2020
CSS Aligning Last Item to the Bottom of a Container Using Flex Attribute
| The ordered list has its initial layout controlled by a row flexbox layout and the list items are controlled by a column flexbox layout. |
Containing ul tag flexbox CSS is… ul { display: flex; flex-flow: row wrap; justify-content: flex-start; } |
Markup for the list item is…<li> <h3>Header</h3> <p class="price"><sup>$</sup>100</p> <p class="details">CSS Aligning Last Item</p> <a class="button" href=""><p>Buy Now</p></a> </li> |
The Flexbox CSS for the li tag is…li { display: flex; flex-flow: column nowrap; margin-top: auto; } |
 |
| JSFiddle Example Link |
Saturday, February 22, 2020
PHP is not recognized as an internal or external command in command prompt
|
Need to add C:\xampp\php to your PATH environment variable. Then close your command prompt and restart again. It is very important because if you do not restart your command prompt then changes will not be reflected. |
|
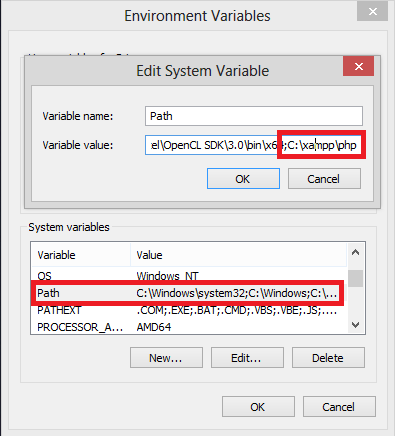
Go to My Computer->properties -> Advanced system setting
Now click on Environment Variables  |
Add ;C:\xampp\php in path variable value
 |
|
Now restart command prompt DONE!
Note: Make sure you run CMD via run as administrator |
How to Install MySQL on Windows
|
Download the MySQL Installer from dev.mysql.com. The two download options are a web-community version and a full version. The web-community version will only download the server, by default, but you can select other applications (like Workbench) as desired. The full installer will download the server and all the recommended additional applications. (You’ll also be asked to create a user account, but you skip this part by scrolling down to the bottom and clicking "No thanks, just start my download".)  |
Run the installer that you downloaded 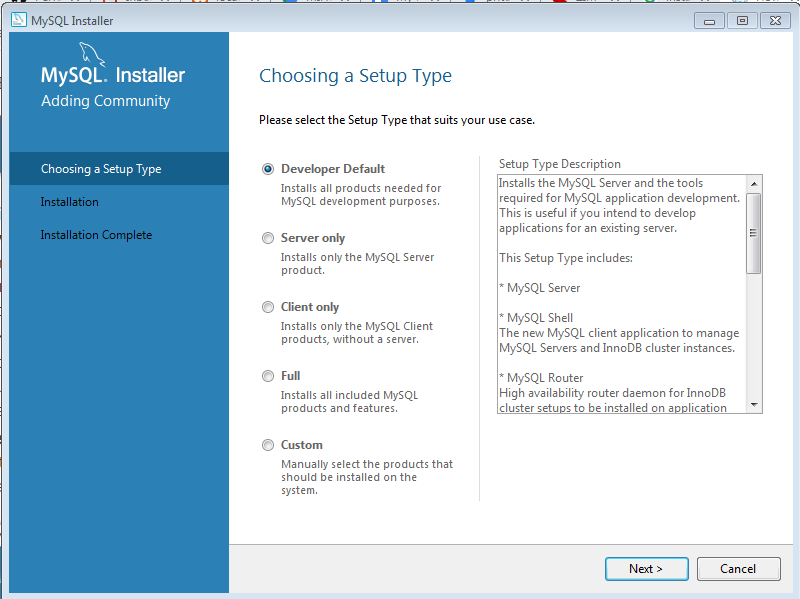 |
Determine which setup type you would like to use for the installation
|
|
Install the server instance and whichever additional products you selected. Then begin the configuration process by selecting the availability level (most users will use the default, standalone version).
Complete the configuration process by following the on-screen instructions. You’ll want to make sure to install MySQL as a Service so that Windows can automatically start the service after a reboot or can restart the service if it fails. For additional, step-by-step instructions, see MySQL Server Configuration with MySQL Installer. 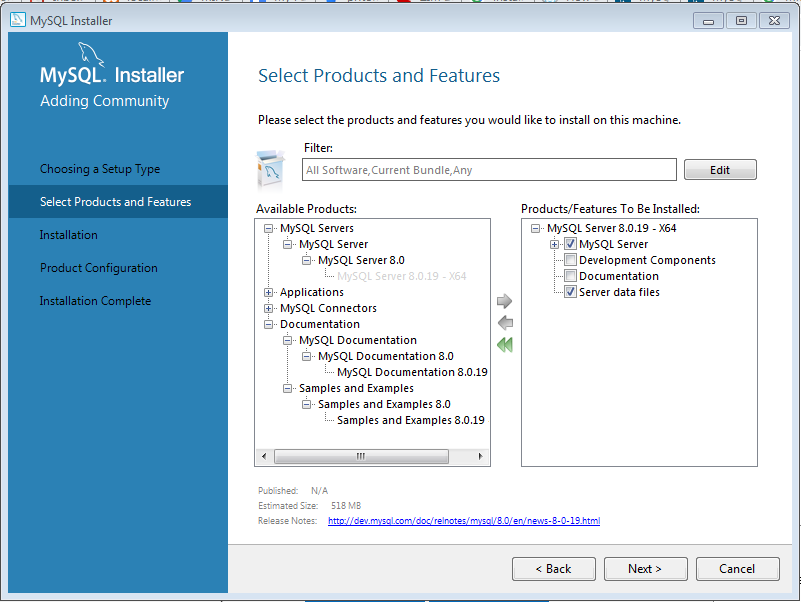  |
| And finally MySQL installed into your system. |
Thursday, February 20, 2020
ReactJS Call Methods / Functions Between Component And Layout
| In order to execute a function from a layout / component, you will need to pass component / layout reference to other side. React supports a special attribute that you can attach to any component, pass reference to other side, and you can access the functions of the component in the layout accessing |
| Sample App.js |
import React, { Suspense, lazy } from "react";
import { BrowserRouter, Switch } from "react-router-dom";
import DashboardLayoutRoute from "./DashboardLayout";

import Home from "./Home";

const Connections = lazy(() => import("./Connections"));

class App extends React.Component {
  constructor() {
    super();

    console.log("App Initialized");
  }

  render() {
    return (
      <BrowserRouter basename={this.APP_PATH}>
        <Switch>
          <DashboardLayoutRoute exact path="/" component={Home} />
        </Switch>
        <Suspense fallback={<div>Loading...</div>}>
          <Switch>
            <DashboardLayoutRoute path="/connections" component={Connections} />
          </Switch>
        </Suspense>
      </BrowserRouter>
    );
  }
}

export default App;
|
| Sample Layout |
import React from "react";
import { Route } from "react-router-dom";

class DashboardLayoutComponent extends React.Component {
  constructor(props) {
    super(props);

    this.callBackToComponent = this.callBackToComponent.bind(this);
  }

  componentDidMount() {
    console.log("Layout Component Did Mount");
    let _this = this;
    if (this.props.children.type._result instanceof Promise) {
      this.props.children.type._result.then(function(data) {
        _this.callBackToComponent();
      });
    } else {
      this.callBackToComponent();
    }
  }

  componentDidUpdate() {
    console.log("Layout Component Did Update");
    let _this = this;
    if (this.props.children.type._result instanceof Promise) {
      this.props.children.type._result.then(function(data) {
        _this.callBackToComponent();
      });
    } else {
      this.callBackToComponent();
    }
  }

  callBackToComponent() {
    let t = this.props.children.type;
    if (t.prototype !== undefined) {
      t.prototype.callBackToParentComponent(this);
    } else {
      // If you use your Route in Suspense
      t._result.prototype.callBackToParentComponent(this);
    }
  }

  callbackParent() {
    console.log("Layout function called from some component");
  }

  render() {
    return (
      <div className={"dashboard-main-container"}>
        <div className="container">
          <div className="row">
            <div className="col-sm-10 right-body-container">
              {this.props.children}
            </div>
          </div>
        </div>
      </div>
    );
  }
}

const DashboardLayoutRoute = ({ component: Component, ...rest }) => {
  return (
    <Route
      {...rest}
      render={matchProps => (
        <DashboardLayoutComponent {...matchProps}>
          <Component key={matchProps.match.params.id} {...matchProps} />
        </DashboardLayoutComponent>
      )}
    />
  );
};

export default DashboardLayoutRoute;
|
| Sample Component |
import React from "react";
import { Link } from "react-router-dom";

class Connections extends React.Component {
  constructor() {
    super();

    console.log("Connections");
  }

  // this function will be called from layout function with self reference
  // so calling [layout.callbackParent()] will call a function inside layout component itself
  callBackToParentComponent(layout) {
    console.log("callBackToParentComponent for Connections");
    layout.callbackParent();
  }

  render() {
    return (
      <div>
        <h1>Connections</h1>
        <Link to={"/"}>Home</Link>
      </div>
    );
  }
}

export default Connections;
|
| Sample console.log |
App Initialized App Initialized Layout Component Did Mount callBackToParentComponent for Connections Layout function called from some component Connections Connections Home Home Layout Component Did Mount callBackToParentComponent for Home Layout function called from some component Connections Connections Layout Component Did Mount callBackToParentComponent for Connections Layout function called from some component |
Sample Output:  |
|
Live Example At codesandbox.io: https://codesandbox.io/s/reactjs-call-methods-functions-between-component-and-layout-fydou |
Sunday, February 16, 2020
PHP - Encryption and Decryption of Large Files with OpenSSL
|
PHP lacks a build-in function to encrypt and decrypt large files. openssl_encrypt can be used to encrypt strings, but loading a huge file into memory is a bad idea.
This example uses the symmetric AES-256-CBC algorithm to encrypt smaller chunks of a large file and writes them into another file. |
<?php define('FILE_ENCRYPTION_BLOCKS', 10000); /** * Encrypt the passed file and saves the result in a new file with ".enc" as suffix. * * @param string $source Path to file that should be encrypted * @param string $key The key used for the encryption * @param string $dest File name where the encryped file should be written to. * @return string|false Returns the file name that has been created or FALSE if an error occured */ function encryptFile($source, $key, $dest) { $key = substr(sha1($key, true), 0, 16); $iv = openssl_random_pseudo_bytes(16); $error = false; if ($fpOut = fopen($dest, 'w')) { // Put the initialzation vector to the beginning of the file fwrite($fpOut, $iv); if ($fpIn = fopen($source, 'rb')) { while (!feof($fpIn)) { $plaintext = fread($fpIn, 16 * FILE_ENCRYPTION_BLOCKS); $ciphertext = openssl_encrypt($plaintext, 'AES-256-CBC', $key, OPENSSL_RAW_DATA, $iv); // Use the first 16 bytes of the ciphertext as the next initialization vector $iv = substr($ciphertext, 0, 16); fwrite($fpOut, $ciphertext); } fclose($fpIn); } else { $error = true; } fclose($fpOut); } else { $error = true; } return $error ? null : $dest; } /** * Dencrypt the passed file and saves the result in a new file, removing the * last 4 characters from file name. * * @param string $source Path to file that should be decrypted * @param string $key The key used for the decryption (must be the same as for encryption) * @param string $dest File name where the decryped file should be written to. * @return string|false Returns the file name that has been created or FALSE if an error occured */ function decryptFile($source, $key, $dest) { $key = substr(sha1($key, true), 0, 16); $error = false; if ($fpOut = fopen($dest, 'w')) { if ($fpIn = fopen($source, 'rb')) { // Get the initialzation vector from the beginning of the file $iv = fread($fpIn, 16); while (!feof($fpIn)) { $ciphertext = fread($fpIn, 16 * (FILE_ENCRYPTION_BLOCKS + 1)); // we have to read one block more for decrypting than for encrypting $plaintext = openssl_decrypt($ciphertext, 'AES-256-CBC', $key, OPENSSL_RAW_DATA, $iv); // Use the first 16 bytes of the ciphertext as the next initialization vector $iv = substr($ciphertext, 0, 16); fwrite($fpOut, $plaintext); } fclose($fpIn); } else { $error = true; } fclose($fpOut); } else { $error = true; } return $error ? null : $dest; } $key = 'my secret key'; $fileName = __DIR__ . '/testfile.txt'; file_put_contents($fileName, 'File would be encrypted...'); $result = encryptFile($fileName, $key, $fileName . '.enc'); if ($result) { echo "FILE ENCRYPTED TO " . $result; $result = decryptFile($result, $key, $fileName . '.dec'); if ($result) { echo "<BR>FILE DECRYPTED TO " . $result; } } ?> |
Subscribe to:
Posts (Atom)