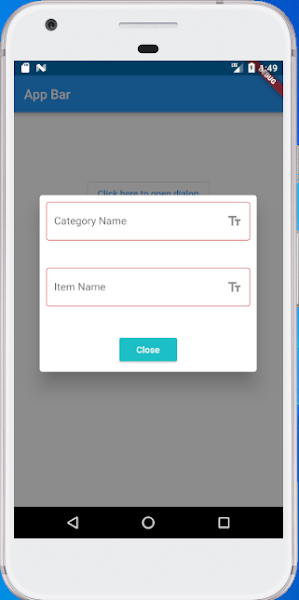
| In this tutorial, you will learn how to create an AlertDialog with a TextField in Flutter. We will go through all the steps and at the end, you will have a complete code example that displays an alert dialog with a text field. |
| The basic code to create an AlertDialog widget with a single TextField looks like this. |
AlertDialog(
  title: Text('TextField in Dialog'),
  content: TextField(
    onChanged: (value) { },
    decoration: InputDecoration(hintText: "Text Field in Dialog"),
  ),
),
|
|
Complete Code Example Now that we have discussed different code snippets separately, let’s put everything into one complete app code example with scroll bar enabled. |
import 'package:flutter/material.dart';

void main() => runApp(MyApp());

class MyApp extends StatelessWidget {
  const MyApp({Key? key}) : super(key: key);

  @override
  Widget build(BuildContext context) {
    return MaterialApp(
      title: 'Flutter Demo',
      theme: ThemeData(
        primarySwatch: Colors.blue,
      ),
      home: ApplicationPage(),
    );
  }
}

class ApplicationPage extends StatefulWidget {
  const ApplicationPage({Key? key}) : super(key: key);

  @override
  _ApplicationPage createState() => _ApplicationPage();
}

class _ApplicationPage extends State<ApplicationPage> {
  @override
  Widget build(BuildContext context) {
    return Container(
        child: new Scaffold(
          backgroundColor: Colors.white,
          appBar: AppBar(title: Text("App Bar"),),
          body: Center(
            child: Column(
              children: [
                SizedBox(height: 100),
                OutlinedButton(
                    child: Text("Click here to open dialog"),
                    onPressed: () {
                      openShowDialog(context);
                    }
                ),
              ],
            ),
          ),
        )
    );
  }

  void openShowDialog(BuildContext context) {
    showGeneralDialog(
      context: context,
      barrierDismissible: true,
      barrierLabel: MaterialLocalizations.of(context).modalBarrierDismissLabel,
      barrierColor: Colors.black45,
      transitionDuration: const Duration(milliseconds: 200),
      pageBuilder: (BuildContext buildContext, Animation animation, Animation secondaryAnimation) {
        return Dialog(
          insetPadding: EdgeInsets.symmetric(horizontal: 40.0, vertical: 50.0),
          child: Container(
            child: ListView(
              shrinkWrap: true,
              padding: EdgeInsets.all(10),
              children: [
                Column(
                  mainAxisSize: MainAxisSize.min,
                  children: [
                    TextFormField(
                      decoration: const InputDecoration(
                        labelText: 'Category Name',
                        errorText: '',
                        border: OutlineInputBorder(),
                        suffixIcon: Icon(
                          Icons.text_fields,
                        ),
                      ),
                    ),
                    SizedBox(height: 20),
                    TextFormField(
                      decoration: const InputDecoration(
                        labelText: 'Item Name',
                        errorText: '',
                        border: OutlineInputBorder(),
                        suffixIcon: Icon(
                          Icons.text_fields,
                        ),
                      ),
                    ),
                    SizedBox(height: 20),
                    RaisedButton(
                      onPressed: () {
                        Navigator.of(context).pop();
                      },
                      child: Text(
                        "Close",
                        style: TextStyle(color: Colors.white),
                      ),
                      color: const Color(0xFF1BC0C5),
                    )
                  ],
                ),
              ],
            ),
          ),
        );
      }
    );
  }
}
|
Showing posts with label Dialog. Show all posts
Showing posts with label Dialog. Show all posts
Sunday, September 26, 2021
AlertDialog with a TextField in Flutter as Well as All type of fields | Flutter Custom Dialog using Widget
Thursday, May 18, 2017
jQuery UI Popup Dialog Simple Example
Its fairly easy to implement jQuery popup dialog. You just need to include jQuery UI JS and CSS in your project and need to call the method as follows:
.dialog() with additional options as you want.
$("#dialog-form").dialog({
title: "Dialog Title",
width: 500,
height: 400,
autoOpen: false,
modal: true,
buttons: {
"Ok": function() {
$('#buttonExecute').val("Show Dialog - Yes");
$(this).dialog("close");
},
"Cancel": function() {
$('#buttonExecute').val("Show Dialog - No");
$(this).dialog("close");
}
},
close: function( event, ui ) {
console.log(event);
console.log(ui);
},
open: function( event, ui ) {
$('#buttonExecute').val("Show Dialog - Open");
}
});
$('#buttonExecute').click(function() {
$("#dialog-form").dialog("open");
});
Which will show dialog as below screenshot:
You can download full example from below link:
Click here to download.
Saturday, April 27, 2013
Android custom dialog example
In this tutorial, we show you how to create a custom dialog in Android. See following steps :
File : res/layout/main.xml
File : res/layout/login.xml
Read the comment and demo in next step, it should be self-explorary.
- Create a custom dialog layout (XML file).
- Attach the layout to
Dialog. - Display the
Dialog. - Done.
1 Android Layout Files
Two XML files, one for main screen, one for custom dialog.File : res/layout/main.xml
<?xml version="1.0" encoding="utf-8"?>
<LinearLayout xmlns:android="http://schemas.android.com/apk/res/android"
    android:layout_width="fill_parent"
    android:layout_height="fill_parent"
    android:orientation="vertical" >

    <Button
        android:id="@+id/btnLogin"
        android:layout_width="wrap_content"
        android:layout_height="wrap_content"
        android:text="Login Dialog" />

</LinearLayout>
<?xml version="1.0" encoding="UTF-8"?>
    <TableLayout xmlns:android="http://schemas.android.com/apk/res/android"
        android:id="@+id/tableLayout1"
        android:layout_width="fill_parent"
        android:layout_height="fill_parent" >

        <TextView
            android:id="@+id/textView1"
            android:layout_width="match_parent"
            android:layout_height="wrap_content"
            android:text="@string/sldjfsjdflsdf"
            android:textAppearance="?android:attr/textAppearanceLarge" />

        <LinearLayout
            android:id="@+id/linearLayout1"
            android:layout_width="wrap_content"
            android:layout_height="wrap_content" >

            <ImageView
                android:id="@+id/imageView1"
                android:layout_width="45dp"
                android:layout_height="45dp"
                android:src="@drawable/user" />

            <EditText
                android:id="@+id/editText1"
                android:layout_width="wrap_content"
                android:layout_height="wrap_content"
                android:layout_weight="1" >

                <requestFocus />
            </EditText>

        </LinearLayout>

        <LinearLayout
            android:id="@+id/linearLayout2"
            android:layout_width="wrap_content"
            android:layout_height="wrap_content" >

            <ImageView
                android:id="@+id/imageView2"
                android:layout_width="45dp"
                android:layout_height="45dp"
                android:src="@drawable/password" />

            <EditText
                android:id="@+id/editText2"
                android:layout_width="wrap_content"
                android:layout_height="wrap_content"
                android:layout_weight="1"
                android:inputType="textPassword" />

        </LinearLayout>

        <Button
            android:id="@+id/btnLoginPrompt"
            android:layout_width="wrap_content"
            android:layout_height="wrap_content"
            android:text="@string/login" />

    </TableLayout>
Button btnLogin = (Button)findViewById(R.id.btnLogin);
btnLogin.setOnClickListener(new OnClickListener() {
 public void onClick(View arg0) {
  final Dialog dialog = new Dialog(ContactspaceandroidActivity.this);
  dialog.setContentView(R.layout.login);
  dialog.setTitle("Title...");

  dialog.show();

  Button azxc = (Button) dialog.findViewById(R.id.btnLoginPrompt);
  azxc.setOnClickListener(new OnClickListener() {
   @Override
      public void onClick(View arg0) {
       System.out.println("BTN LOGIN CLICKED.");
       EditText txtUserName = (EditText) dialog.findViewById(R.id.txtUserName);
       EditText txtPassword = (EditText) dialog.findViewById(R.id.txtPassword);
       if(txtUserName.getText().length() <= 0) {
        Toast.makeText(ContactspaceandroidActivity.this, "Enter username.", Toast.LENGTH_LONG).show();
        return;
       }
       if(txtPassword.getText().length() <= 0) {
        Toast.makeText(ContactspaceandroidActivity.this, "Enter password.", Toast.LENGTH_LONG).show();
        return;
       }
      }
  });
 }
});
Subscribe to:
Comments (Atom)

