Saturday, October 7, 2017

Stripe Payment API: Create Charge Or Payment Using Java Code

You need a Token (Saved credit card instance) to create a Payment which is known as Charge in Stripe API. Creating Charge in Stripe is equal to creating a Payment. 

Payment API documentation:
https://stripe.com/docs/api#charges 


package com.pkm;

import common.HttpJavaClient;
import java.util.Date;
import java.util.HashMap;
import java.util.Map;

/**
 * @author PRITOM
 */
public class StripeCreatePayment {
    static final String API_KEY = "sk_test_eXF5nNyXat29WjWrqHK92rcj";
    static final String TOKEN_URL = "https://api.stripe.com/v1/tokens";
    static final String PAYMENT_URL = "https://api.stripe.com/v1/charges";
    
    public static void main(String[] args) {        
        Map params = new HashMap();
        params.put("amount", "210");
        params.put("currency", "aud");
        params.put("source", createToken());
        params.put("description", (new Date()).toString());
        String paramString = HttpJavaClient.buildParameters(params);
        
        Map headers = new HashMap();
        headers.put("Authorization", "Bearer " + API_KEY);
        headers.put("tls", "TLSv1.2");
        
        HttpJavaClient.Response response = HttpJavaClient.doPost(PAYMENT_URL, paramString, HttpJavaClient.Type.URL_ENCODED, headers);
        HttpJavaClient.println(response);
    }
    
    static String createToken() {
        Map params = new HashMap();
        params.put("card[name]", "Pritom Kumar");
        params.put("card[number]", "4242424242424242");
        params.put("card[exp_month]", "12");
        params.put("card[exp_year]", "19");
        params.put("card[cvc]", "123");
        String paramString = HttpJavaClient.buildParameters(params);
        
        Map headers = new HashMap();
        headers.put("Authorization", "Bearer " + API_KEY);
        headers.put("tls", "TLSv1.2");
        
        HttpJavaClient.Response response = HttpJavaClient.doPost(TOKEN_URL, paramString, HttpJavaClient.Type.URL_ENCODED, headers);
        if (response.getCode() == 200) {
            String token = response.getBody().substring(response.getBody().indexOf("\"id\": \"") + 7);
            return token.substring(0, token.indexOf("\""));
        }
        return null;
    }
}

And output would be for successful transaction line below:


  "id": "ch_1BACCFFIwfarG3vBdzS2A09q",
  "object": "charge",
  "amount": 210,
  "amount_refunded": 0,
  "application": null,
  "application_fee": null,
  "balance_transaction": "txn_1BACCFFIwfarG3vBWUtFsX4N",
  "captured": true,
  "created": 1507359243,
  "currency": "aud",
  "customer": null,
  "description": "Sat Oct 07 12:54:06 BDT 2017",
  "destination": null,
  "dispute": null,
  "failure_code": null,
  "failure_message": null,
  "fraud_details": {},
  "invoice": null,
  "livemode": false,
  "metadata": {},
  "on_behalf_of": null,
  "order": null,
  "outcome": {
    "network_status": "approved_by_network",
    "reason": null,
    "risk_level": "normal",
    "seller_message": "Payment complete.",
    "type": "authorized"
  },
  "paid": true,
  "receipt_email": null,
  "receipt_number": null,
  "refunded": false,
  "refunds": {
    "object": "list",
    "data": [],
    "has_more": false,
    "total_count": 0,
    "url": "/v1/charges/ch_1BACCFFIwfarG3vBdzS2A09q/refunds"
  },
  "review": null,
  "shipping": null,
  "source": {
    "id": "card_1BACCDFIwfarG3vBAnQYrCBR",
    "object": "card",
    "address_city": null,
    "address_country": null,
    "address_line1": null,
    "address_line1_check": null,
    "address_line2": null,
    "address_state": null,
    "address_zip": null,
    "address_zip_check": null,
    "brand": "Visa",
    "country": "US",
    "customer": null,
    "cvc_check": "pass",
    "dynamic_last4": null,
    "exp_month": 12,
    "exp_year": 2019,
    "fingerprint": "CjZNbbCtG5QSnuIS",
    "funding": "credit",
    "last4": "4242",
    "metadata": {},
    "name": "Pritom Kumar",
    "tokenization_method": null
  },
  "source_transfer": null,
  "statement_descriptor": null,
  "status": "succeeded",
  "transfer_group": null
}

Thursday, October 5, 2017

Ensure DirectX 9.0c or higher is installed on your computer | Which version of DirectX is on your PC | Windows - How to check the version of DirectX installed

Ensure DirectX 9.0c or higher is installed on your computer | Which version of DirectX is on your PC | Windows - How to check the version of DirectX installed

At first you to open command prompt. Clink "Start" and type "command" and select windows command prompt:


Then type "dxdiag" and press Enter, will show below screenshot:


That's all, we now know that which version of DirectX installed.

Saturday, September 30, 2017

Make nginx to pass hostname of the upstream when reverseproxying How to add a response header on nginx when using proxy_pass | Forward Custom Header from Nginx Reverse Proxy | Nginx request forward | Forward request using Nginx

Actually you can do that via proxy_set_header.

For more details look here: 

http://nginx.org/en/docs/http/ngx_http_proxy_module.html#proxy_set_header 


#Upstream is useful for same server
upstream localhost1 {
   server 127.0.0.1:80;  # this is new server, by IP address
}

server {
    listen   8500;
    server_name  localhost local.host;
    #access_log off;
    
    location / {
        proxy_pass http://dragon71.000webhostapp.com/;
        proxy_set_header    Nginx-Host             $host;
        proxy_set_header    Nginx-X-Real-IP        $remote_addr;
        proxy_set_header    Nginx-X-Forwarded-for  $remote_addr;
        proxy_set_header    Nginx-Target           base;
    
        location /pojo/ {
            proxy_pass http://localhost1/pkm/;
            proxy_set_header    Nginx-Host             $host;
            proxy_set_header    Nginx-X-Real-IP        $remote_addr;
            proxy_set_header    Nginx-X-Forwarded-for  $remote_addr;
            proxy_set_header    Nginx-Target           pojo;
        }
    }
    
    error_page  404               /404.html;
    error_page  500 502 503 504   /50x.html;
    location = /50x.html {
        root   html;
    }
}


And in php script:

Array
(
    [MIBDIRS] => ........
    [HTTP_HOST] => localhost
    [HTTP_NGINX_HOST] => localhost
    [HTTP_NGINX_X_REAL_IP] => 127.0.0.1
    [HTTP_NGINX_X_FORWARDED_FOR] => 127.0.0.1
    [HTTP_NGINX_TARGET] => base
    [HTTP_CACHE_CONTROL] => ....
)


If the proxy_pass directive is specified without a URI,


location /app/ {
    proxy_pass      http://127.0.0.1;
}

test.com/app/xxxxx =>  http://127.0.0.1/xxxxx

If the proxy_pass directive is specified with a URI:

location /app/ {
    proxy_pass      http://127.0.0.1/maped_dir/;
}

test.com/app/xxxxx =>  http://127.0.0.1/maped_dir/xxxxx

Forward the requested Host header:

By default, the Host header from the request is not forwarded, but is set based on the proxy_pass statement. To forward the requested Host header, it is necessary to use:

proxy_set_header Host $host;

If the location is given by regular expression, can not be a URI part in proxy_pass directive, unless there are variables in the directive.

location  ~ ^/app/(.*)$ {
    #proxy_pass   http://127.0.0.1/some_dir;    #error
    proxy_pass   http://127.0.0.1/some_dir/$1r;    #ok
}

variables in proxy_pass directive:

location ~ ^/app/(.*)$ {
    proxy_pass       http://127.0.0.1:$1;
}

test.com/app/8081 => http://127.0.0.1:8081

and:

location ~ ^/app/(.*)$ {
    proxy_pass       http://127.0.0.1:9999/some_dir/$1;
}

test.com/app/request/xxxxx => http://127.0.0.1:9999/some_dir/xxxxx

with a rewrite directive in the location:

If the rewrite rule is hit, the URI specified in the directive is ignored and the full changed request URI is passed to the server:

location  /app/ {
    rewrite    ^/app/hit/(.*)$ /hit_page.php?path=$1 break;
    proxy_pass   http://127.0.0.1:9999/some_dir/;
}
/app/hit/some/request/?name=xxxxx

=> http://127.0.0.1:9999/hit_page.php?path=some/request/&name=xxxxx

/app/not_hit/some/request/?name=xxxxx

=> http://127.0.0.1:9999/some_dir/not_hit/some/request/?name=xxxxx

Nginx Windows: How to Install | How to Install Nginx on Windows

At first you have to download Nginx from Nginx Downloads

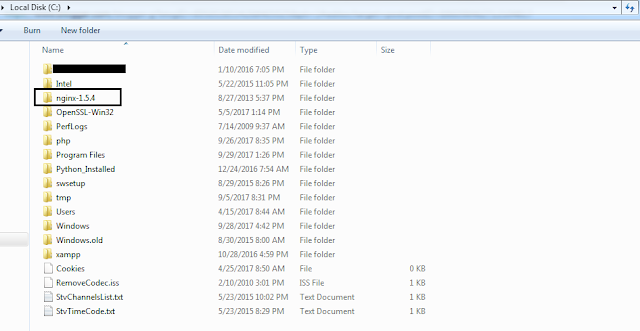
Then extract it to c directory as below screenshot:


Then navigate to "nginx-1.9.9" and execute below command to start nginx server:

nginx.exe

Your server started at port 80 as http://localhost:80


To stop nginx server run below command:

nginx.exe -s stop

To change nginx port navigate to folder "config" folder and edit file "nginx.conf", find the string "listen       80;" and change it to suppose "listen       8200;", stop and start nginx, then browse to http://localhost:8200 as below:


Wednesday, September 27, 2017

Stripe Payment GateWay | Refund Stripe VIA API | Stripe API Refund Payment

Stripe Payment GateWay | Refund Stripe VIA API | Stripe API Refund Payment


<?php
include_once "curl.php";
$key = "sk_test_eXF4nNy........rcHK95rwj";

$params = array(
    "charge" => "ch_1B3bkMFIwfarG3vBaBs0hodp",
    "amount" => 10,
    "metadata" => array(
        "Refund-reason" => "Some reason to fail",
        "Refund-by" => "Pritom Kumaar"
    )
);

$url = "https://api.stripe.com/v1/refunds";

$headers[] = "Authorization: Bearer " . $key;
$headers[] = "Content-Type: application/x-www-form-urlencoded";

$response = CurlExecutor::execute($url, "POST", $params, null, $headers);
$response["response"] = json_decode($response["response"]);
CurlExecutor::prettyPrint($response);

And output would be like below:

Array
(
    [code] => 200
    [response] => stdClass Object
        (
            [id] => re_1B6h5DFIwfarG3vBvFwcbNl9
            [object] => refund
            [amount] => 10
            [balance_transaction] => txn_1B6h5DFIwfarG3vBALLuMSUw
            [charge] => ch_1B3bkMFIwfarG3vBaBs0hodp
            [created] => 1506524659
            [currency] => aud
            [metadata] => stdClass Object
                (
                    [Refund-reason] => Some reason to fail
                    [Refund-by] => Pritom Kumaar
                )

            [reason] => 
            [receipt_number] => 
            [status] => succeeded
        )

)

Monday, September 25, 2017

Clear previously set headers php | How to fix “Headers already sent” error in PHP

headers_sent indicates that it is too late to remove headers. They're already sent. Hence the name of the function.

What you want is to specifically check if the headers have not been sent yet. Then you know it's safe to modify them.


<?php
header('Content-type: application/csv');

if (!headers_sent()) {
    echo "<pre>";
    print_r(headers_list());
    echo "</pre>";
}

header_remove();
header('Content-type: text/html');
echo "HERE";


Array
(
    [0] => X-Powered-By: PHP/7.0.9
    [1] => Content-type: application/csv
)
HERE

Monday, September 18, 2017

Stripe Using Connect with Deferred Standard Accounts | Stripe Create Deferred Standard Account | Stripe Create Connected Account Using API Call

1 Login to your stripe account and navigate to https://dashboard.stripe.com/account/applications/settings and follow below steps:


2. Now have to create Deferred (standard) account using below code snippet (API call). Later account holder will login to their account and complete their verification process:


<?php
include_once "curl.php";

$api_key = "sk_test_eXF..........jWrcHK95rwj";
$url = "https://api.stripe.com/v1/accounts";

$params = array(
    "type" => "standard",
    "country" => "AU",
    "email" => "pritomkucse+stripe1@gmail.com"
);

$headers[] = "Authorization: Bearer $api_key";
$headers[] = "Content-Type: application/x-www-form-urlencoded";

$result = CurlExecutor::execute($url, "POST", null, $params, $headers);
$result["response"] = json_decode($result["response"]);
CurlExecutor::prettyPrint($result);

Successful output would be like below:


Array
(
    [code] => 200
    [response] => stdClass Object
        (
            [id] => acct_1B3......1R7ddx6
            [object] => account
            [business_logo] => 
            [business_name] => 
            [business_url] => 
            [charges_enabled] => 1
            [country] => AU
            [default_currency] => aud
            [details_submitted] => 
            [display_name] => 
            [email] => pritomkucse+stripe1@gmail.com
            [keys] => stdClass Object
                (
                    [secret] => sk_test_wel..........5fXfyBsmhI6
                    [publishable] => pk_test_mlPoU..........zBUbHBFof
                )

            [metadata] => stdClass Object
                (
                )

            [payouts_enabled] => 
            [statement_descriptor] => 
            [support_email] => 
            [support_phone] => 
            [timezone] => Etc/UTC
            [type] => standard
        )

)

Use "keys/secret" (actually it is "Secret key" for API), you can use this Key to process all your transactions.

And list of your connected account is below: