|
Putting the jar in the lib folder should do the trick.
The default lib folder is gone as of Grails 3.0. grails.github.io/grails-doc/3.0.x/guide/single.html#upgrading --> "Dependency resolution should be used to resolve JAR files" |
| If Grails by default don't take the local .jar libraries located in <GRAILS-APP-DIR>/lib (seems that with Grails >= 3.X the /lib folder default configuration is removed) the easy way to enforce it is modifying build.gradle to add a local directory dependency for it. |
| For almost all cases is of course better to use the maven repos, but in some cases it's possible to have some other libraries which aren't in a public repo. To do so we have to add these libraries in some lib folder then modify the <GRAILS-APP-DIR>/build.gradle and add something like: |
dependencies {
    ...
	// lib folder or any other name one can use
    compile fileTree(dir: './lib', include: ['*.jar'])
    ...
}
|
| If you want you can use another directory (not /lib) since you're specifying it. Of course use the correct scope (for example for jars which probably already are in your application container class path the scope will be runtime instead of compile) |
| You can download and drop the jar file into the grails-app/lib directory directly. This should be carefully maintained by someone time to time. Other developers working on the same project might not be aware of its presence. Plus you cannot easily upgrade versions in a transparent manner. |
Showing posts with label 2021-october. Show all posts
Showing posts with label 2021-october. Show all posts
Thursday, October 21, 2021
Grails 4: How to add Java JAR files to Grails project | How to add an external library or JAR file that is not a grails plugin to the Grails project
Get Android API level of phone currently running my application
| How do I get the Api level of the phone curently running my application |
|
Check android.os.Build.VERSION, which is a static class that holds various pieces of information about the Android OS a system is running.
If you care about all versions possible (back to original Android version), as in minSdkVersion is set to anything less than 4, then you will have to use android.os.Build.VERSION.SDK, which is a String that can be converted to the integer of the release. If you are on at least API version 4 (Android 1.6 Donut), the current suggested way of getting the API level would be to check the value of android.os.Build.VERSION.SDK_INT, which is an integer. |
| In either case, the integer you get maps to an enum value from all those defined in android.os.Build.VERSION_CODES: |
SDK_INT value        Build.VERSION_CODES        Human Version Name
    1                  BASE                      Android 1.0 (no codename)
    2                  BASE_1_1                  Android 1.1 Petit Four
    3                  CUPCAKE                   Android 1.5 Cupcake
    4                  DONUT                     Android 1.6 Donut
    5                  ECLAIR                    Android 2.0 Eclair
    6                  ECLAIR_0_1                Android 2.0.1 Eclair
    7                  ECLAIR_MR1                Android 2.1 Eclair
    8                  FROYO                     Android 2.2 Froyo
    9                  GINGERBREAD               Android 2.3 Gingerbread
   10                  GINGERBREAD_MR1           Android 2.3.3 Gingerbread
   11                  HONEYCOMB                 Android 3.0 Honeycomb
   12                  HONEYCOMB_MR1             Android 3.1 Honeycomb
   13                  HONEYCOMB_MR2             Android 3.2 Honeycomb
   14                  ICE_CREAM_SANDWICH        Android 4.0 Ice Cream Sandwich
   15                  ICE_CREAM_SANDWICH_MR1    Android 4.0.3 Ice Cream Sandwich
   16                  JELLY_BEAN                Android 4.1 Jellybean
   17                  JELLY_BEAN_MR1            Android 4.2 Jellybean
   18                  JELLY_BEAN_MR2            Android 4.3 Jellybean
   19                  KITKAT                    Android 4.4 KitKat
   20                  KITKAT_WATCH              Android 4.4 KitKat Watch
   21                  LOLLIPOP                  Android 5.0 Lollipop
   22                  LOLLIPOP_MR1              Android 5.1 Lollipop
   23                  M                         Android 6.0 Marshmallow in October 2015
   24                  N                         Android 7.0 Nougat in August 2016
   25                  N_MR1                     Android 7.1.1 Nougat in October 2016
   26                  O                         Android 8.0 Oreo in August 2017
   27                  O_MR1                     Android 8.1 Oreo MR1 in December 2017
   28                  P                         Android 9 Pie in August 2018
   29                  Q                         Android 10 in September 2019
   30                  R                         Android 11 in September 2020
  10000                CUR_DEVELOPMENT           Current Development Version
|
| All informatio collected from https://developer.android.com/reference/android/os/Build.VERSION_CODES |
Tuesday, October 12, 2021
Grails 4: How to load datasource configuration from external file in grails 4 In Grails, how do I put my DB username and password in an external property file
|
I'm trying to take certain database configurations from variables and put them into an external properties file.
I am writing a grails 4.0.11 application. My datasource written in application.groovy file. I want to load datasource configuration like username,password,DB from an external file. Is there any way to do it in grails 4+ versions. Here is my datasource configuration in application.groovy using static database name and other properties like username, password etc:- |
hibernate {
    cache {
        queries = false
        use_second_level_cache = true
        use_query_cache = true
    }
}

dataSource {
    pooled = true
    jmxExport = true
    dialect = "org.hibernate.dialect.MySQL5InnoDBDialect"
    driverClassName = "org.mariadb.jdbc.Driver"
    username = 'root'
    password = ''
    dbCreate = "update"
    url = "jdbc:mysql://localhost/db2?useUnicode=yes" +
            "&characterEncoding=UTF-8&useJDBCCompliantTimezoneShift=true" +
            "&useLegacyDatetimeCode=false&serverTimezone=UTC"
    properties = {
        jmxEnabled = true
        initialSize = 5
        maxActive = 50
        minIdle = 5
        maxIdle = 25
        maxWait = 10000
        maxAge = 10 * 60000
        timeBetweenEvictionRunsMillis = 5000
        minEvictableIdleTimeMillis = 60000
        validationQuery = "SELECT 1"
        validationQueryTimeout = 3
        validationInterval = 15000
        testOnBorrow = true
        testWhileIdle = true
        testOnReturn = false
        ignoreExceptionOnPreLoad = true
        jdbcInterceptors = "ConnectionState;StatementCache(max=200)"
        defaultTransactionIsolation = Connection.TRANSACTION_READ_COMMITTED // safe default
        abandonWhenPercentageFull = 100 // settings are active only when pool is full
        removeAbandonedTimeout = 120
        removeAbandoned = true
        logAbandoned = false // causes stacktrace recording overhead, use only for debugging
    }
}
|
|
Yes, what we can do that is to put database configurations to a file named db_name.properties under [src/main/webapp] directory with following contents:
db_name=some_data_base_name db_user=root_user db_password=some_password Keeping these information will not load automatically. We have to do something magic to load these information into system. We can define database configuration for grails 4 in 3 different ways - 1. grails-app/conf/config/application.yml 2. grails-app/conf/application 3. grails-app/conf/application.groovy So from above list we can easily set our target file to load grails 4 application datasource information because we can write code inside groovy files. First of all remove any datasource related block from above 2 files and add configuration to grails-app/conf/application.groovy file as early statement with some modification. Now we will load database information from some properties file. We sill use Properties to load database information from file. Check below code snippet: |
import grails.util.BuildSettings

import java.sql.Connection

grails {
    gorm {
        failOnError = true
        'default' {
            mapping = {
                cache true
                version false
                autoTimestamp false
                id generator:'assigned'
                '*'(cascadeValidate: 'none')
            }
        }
    }
}
Properties ppt = new Properties()
File file = new File(BuildSettings.BASE_DIR.absolutePath + "/src/main/webapp/db.properties")
println("Setting up db name-${file.absolutePath}, exists=${file.exists() ? 1 : 0}")
if (file.exists()) {
    file.getCanonicalFile().withInputStream { InputStream stream ->
        ppt.load(stream)
    }
}
println(ppt)

hibernate {
    cache {
        queries = false
        use_second_level_cache = true
        use_query_cache = true
    }
}

dataSource {
    pooled = true
    jmxExport = true
    dialect = "org.hibernate.dialect.MySQL5InnoDBDialect"
    driverClassName = "org.mariadb.jdbc.Driver"
    username = 'root'
    password = ''
    dbCreate = "update"
    url = "jdbc:mysql://localhost/${ppt.get("db.name", "none_db_selected")}?useUnicode=yes" +
            "&characterEncoding=UTF-8&useJDBCCompliantTimezoneShift=true" +
            "&useLegacyDatetimeCode=false&serverTimezone=UTC"
    properties = {
        jmxEnabled = true
        initialSize = 5
        maxActive = 50
        minIdle = 5
        maxIdle = 25
        maxWait = 10000
        maxAge = 10 * 60000
        timeBetweenEvictionRunsMillis = 5000
        minEvictableIdleTimeMillis = 60000
        validationQuery = "SELECT 1"
        validationQueryTimeout = 3
        validationInterval = 15000
        testOnBorrow = true
        testWhileIdle = true
        testOnReturn = false
        ignoreExceptionOnPreLoad = true
        jdbcInterceptors = "ConnectionState;StatementCache(max=200)"
        defaultTransactionIsolation = Connection.TRANSACTION_READ_COMMITTED // safe default
        abandonWhenPercentageFull = 100 // settings are active only when pool is full
        removeAbandonedTimeout = 120
        removeAbandoned = true
        logAbandoned = false // causes stacktrace recording overhead, use only for debugging
    }
}
|
| In above example I only set database name, you can set anything from that configuration file as I did for database name. |
Flutter Date Picker - Customization of date picker with color and font size - dive into date picker
|
How do we give option to the user to enter the date which provides the best experience to them?
Instead of creating our own UI to let the user enter the date, The best solution is to use an already available view or widget like DatePicker in the respective Platform. Shows a dialog containing a Material Design date picker. The initialDate property is used to display a default date when DatePicker dialog is opened. SetState will be called to update the selected date in UI and you are done. |
Minimum code to open a date picker: void openDatePicker(BuildContext context) async {
final DateTime? picked = await showDatePicker(
context: context,
initialDate: selectedDate,
firstDate: DateTime(2020),
lastDate: DateTime(2025),
);
if (picked != null && picked != selectedDate) {
setState(() {
selectedDate = picked;
});
}
}
This method actually calls showDatePicker function and waits for the date selected by the user. If a user does not select anything then the date return will be null otherwise the selected date.  |
|
Show/display date but maintain a date range to select date?
By setting the firstDate and the lastDate properties you can't select date outside the range.  |
Show the text input box instead of the calendar view
  void openDatePicker(BuildContext context) async {
    final DateTime? picked = await showDatePicker(
      context: context,
      initialDate: selectedDate, // initial date
      firstDate: DateTime(2020), // date range limit from
      lastDate: DateTime(2025), // date range limit upto
      initialEntryMode: DatePickerEntryMode.input, // show text input mode
    );
    if (picked != null && picked != selectedDate) {
      setState(() {
        selectedDate = picked;
      });
    }
  }
Available options are: calendar: will show calendar when load then you can change to input field mode. input: will show input field mode when load then you can change to calendar view calendarOnly: will show calendar view mode and user can't change to input field mode inputOnly: will show input field mode only and user can't change to calendar view  |
|
Show the year list first when open date picker
This option [initialDatePickerMode: DatePickerMode.year] open date picker to select year first, then user can select date later once year selected. void openDatePicker(BuildContext context) async {
final DateTime? picked = await showDatePicker(
context: context,
initialDate: selectedDate, // initial date
firstDate: DateTime(2020), // date range limit from
lastDate: DateTime(2025), // date range limit upto
initialEntryMode: DatePickerEntryMode.calendar, // show text input mode
initialDatePickerMode: DatePickerMode.year, // will show year selection first
);
if (picked != null && picked != selectedDate) {
setState(() {
selectedDate = picked;
});
}
}
 |
Allow the user to enter a date from a specific day range
  void openDatePicker(BuildContext context) async {
    final DateTime? picked = await showDatePicker(
      context: context,
      initialDate: selectedDate,
      firstDate: DateTime(2020),
      lastDate: DateTime(2025),
      selectableDayPredicate: _decideWhichDayToEnable,
    );
    if (picked != null && picked != selectedDate) {
      setState(() {
        selectedDate = picked;
      });
    }
  }

  bool _decideWhichDayToEnable(DateTime day) {
    if ((day.isAfter(DateTime.now().subtract(Duration(days: 1))) &&
        day.isBefore(DateTime.now().add(Duration(days: 10))))) {
      return true;
    }
    return false;
  }
 |
Change header title and button text
  void openDatePicker(BuildContext context) async {
    final DateTime? picked = await showDatePicker(
      context: context,
      initialDate: selectedDate,
      firstDate: DateTime(2020),
      lastDate: DateTime(2025),
      helpText: 'Select Some Date',
      cancelText: 'No Thanks',
      confirmText: 'Select This Date',
    );
    if (picked != null && picked != selectedDate) {
      setState(() {
        selectedDate = picked;
      });
    }
  }
 |
Change date picker display theme like font color, background color, font size, button color and size
  void openDatePicker(BuildContext context) async {
    final DateTime? picked = await showDatePicker(
      context: context,
      initialDate: selectedDate,
      firstDate: DateTime(2020),
      lastDate: DateTime(2025),
      builder: (context, child) {
        return Theme(
          data: Theme.of(context).copyWith(
            colorScheme: ColorScheme.light(
                primary: Colors.green,
                primaryVariant: Colors.black,
                secondaryVariant: Colors.black,
                onSecondary: Colors.black,
                onPrimary: Colors.white,
                surface: Colors.black,
                onSurface: Colors.black,
                secondary: Colors.black
            ),
            textTheme: const TextTheme(
              headline4: TextStyle(fontSize: 22.0, fontWeight: FontWeight.bold),//3
              bodyText1: TextStyle(fontSize: 25.0),//year selection
              subtitle2: TextStyle(fontSize: 22.0), //2
              caption: TextStyle(fontSize: 24.0),//day selection
              overline: TextStyle(fontSize: 22.0), //1
            ),
            dialogBackgroundColor: Colors.lightBlueAccent,
            textButtonTheme: TextButtonThemeData(
              style: TextButton.styleFrom(
                primary: Colors.red, // button text color
                textStyle: TextStyle(
                  fontSize: 22, // button text size
                )
              ),
            ),
          ),
          child: child!,
        );
      },
    );
    if (picked != null && picked != selectedDate) {
      setState(() {
        selectedDate = picked;
      });
    }
  }
 |
Saturday, October 9, 2021
Flutter Popup Menu Button Example Tutorial
| In flutter, popup menu button widget simply a popup / overflow menu in android and ios. It is similar to flutter dropdownButton but has additional features. We will learn how to attach a popup menu button widget in flutter and its properties in details. |
| In flutter, popup menu button widget displays an overflow menu when pressed. When we select an item the onSelected callback will be fired and the menu is dismissed as well. The value of the menu item selected by the end user will be available with onSelected callback. We can use the value to trigger actions as of our requirements. |
| The itemBuilder property is required which means without using it will throw an error. We have to use the Stateful widget as popup menu button will have a change in the state based on the user selection. |
| We should use either child or icon property but not both as it will throw an error. |
| The icon property is used to change the icon of the popup menu. By default, the popup menu displays an overflow menu(three dots) icon even if we don’t use the icon property. |
| We will use the itemBuilder property to add items to Popup Menu Button. It accepts a list of PopupMenuItems. |
| We will use the elevation property to apply elevation to the popup menu. Elevation makes the popup menu look as it is lifted upward from the background. |
| Full example given below: |
import 'package:flutter/material.dart';

void main() => runApp(const MyApp());

class MyApp extends StatelessWidget {
  const MyApp({Key? key}) : super(key: key);

  // This widget is the root of your application.
  @override
  Widget build(BuildContext context) {
    return MaterialApp(
      title: 'Flutter Demo',
      theme: ThemeData(
        primarySwatch: Colors.blue,
      ),
      home: const MyHomePage(),
    );
  }
}

class MyHomePage extends StatelessWidget {
  const MyHomePage({Key? key}) : super(key: key);

  @override
  Widget build(BuildContext context) {
    return Scaffold(
        appBar: ApplicationAppBar(),
        body: const MyHomePageImpl()
    );
  }
}

class MyHomePageImpl extends StatefulWidget {
  const MyHomePageImpl({Key? key}) : super(key: key);

  @override
  _MyHomePageImpl createState() => _MyHomePageImpl();
}

class _MyHomePageImpl extends State<MyHomePageImpl> {
  @override
  Widget build(BuildContext context) {
    return Container(
      padding: EdgeInsets.all(20),
      child: Column(
        children: [
          const SizedBox(height: 5),
          Row(
            children: [
              Expanded(
                  child: Text("Hello")
              ),
              Container(
                child: PopupMenuButton(
                    icon: Icon(Icons.more_horiz),
                    elevation: 40,
                    shape: const OutlineInputBorder(
                        borderSide: BorderSide(
                            color: Colors.green,
                            width: 2
                        )
                    ),
                    enabled: true,
                    onSelected: (value) {
                      print("Menu [$value] selected");
                    },
                    onCanceled: () {
                      print("None selected");
                    },
                    itemBuilder: (context) => [
                      PopupMenuItem(
                        child: Text("Menu 1"),
                        value: "menu_1",
                      ),
                      PopupMenuItem(
                        child: Text("Menu 2"),
                        value: "menu_2",
                      ),
                      PopupMenuItem(
                        child: Text("Menu 3"),
                        value: "menu_3",
                        enabled: false,
                      ),
                    ]
                ),
                //padding: const EdgeInsets.all(6.0),
                decoration: BoxDecoration(
                  border: Border.all(
                    color: Colors.lightGreen,
                  ),
                  borderRadius: BorderRadius.all(Radius.circular(23)),
                ),
              )
            ],
          ),
        ],
      ),
    );
  }
}

class ApplicationAppBar extends AppBar {
  ApplicationAppBar({Key? key}) : super(key: key,
    title: const Text("Popup Menu Button"),
    actions: [
      IconButton(icon: const Icon(Icons.add), onPressed: () {}),
    ],
  );
}
|
| Ouptu screenshot as below: |


|
Monday, October 4, 2021
Grails 4 - how to attach domain entity manually to session and marked as readonly mode in hibernate session
|
Basically when an entity loaded from database via hibernate transaction manager then automatically attached to hibernate session. If we use Domain.read() then domain entity attached with hibernate session but marked as readonly mode. In such case domain don't get updated on any change, because they marked as readonly mode. But what will happen if you want to attach entity in hibernate session manually and mark them as readonly mode. |
To understand check below example: Account account = new Account() account.id = 10 // we already know that there is an entity with id 10 // and we don't want to fetch data from database Order order = new Order() order.account = account order.save() |
|
Above example will execute but when the statement [order.account = account] executed, a fetch operation will take place like: select account.id,account..... from account where account.id=10 because account entity is not attached with current hibernate session. To overcome this problem we will manually attach account entity to hibernate session and mark them as readonly state using: |
import org.hibernate.internal.SessionImpl

Account.withSession { SessionImpl session ->
	account.attach()
	session.setReadOnly(account, true)
	// readonly entity will not persist in database
}
|
|
Now when saving order, account entity already attached with hibernate session and no additional query will be executed. This mechanism will help you when you know that an entity already exising and you don't want to fetch from db. |
|
Here is another fantastic solution I hope you will like this idea.
As of latest hibernate version, all domain entities must be attached to session (previous hibernate version don't recommend this) So check below case: Account account = new Account() account.id = 10 // we already know that there is an entity with id 10 // and we don't want to fetch data from database Order order = new Order() order.account = account When assign account to order, system expect account must be attached with session as account and order both are domain entities. And because of account is not attached with current session, an select query will took place here to fetch data from database. |
|
To avoid this we can do some simple trick so that without reading one entity from database we can continue our operation.
At first we need to add a Map field to each domain class to hold some value like: class Account implements MyDomainInterface {
Object TEMP = [:]
Object ATTACHED_OBJECT_ENTITIES = [:]
Long id
void setAsCarbonCopy() {
this.TEMP.existing = true
}
Boolean isCarbonCopy(Object o = null) {
return this.TEMP.containsKey("existing")
}
}
You need to do same for order domain class. Then we need to extend metaclass like: import grails.core.GrailsApplication
import org.codehaus.groovy.runtime.metaclass.MissingPropertyExceptionNoStack
GrailsApplication grailsApplication
grailsApplication.domainClasses.each { domainClass ->
domainClass.metaClass.setProperty = { String propertyName, propertyValue ->
MetaProperty metaProperty = domainClass.metaClass.getMetaProperty(propertyName);
if (metaProperty) {
if (propertyValue instanceof MyDomainInterface && propertyValue.isCarbonCopy()) {
//we will set an proxy instance rather then real entity
//proxy entity by default attached with session
//but no addition query run for data collection until call explicitly
Object no = propertyValue.class.proxy(propertyValue.id)
delegate.ATTACHED_OBJECT_ENTITIES[propertyName] = propertyValue
metaProperty.setProperty(delegate, no)
}
else {
metaProperty.setProperty(delegate, propertyValue)
}
}
else {
throw new MissingPropertyExceptionNoStack(propertyName, domainClass.metaClass.theClass)
}
}
domainClass.metaClass.getProperty = { String propertyName ->
if (propertyName != "ATTACHED_OBJECT_ENTITIES" && delegate.ATTACHED_OBJECT_ENTITIES.containsKey(propertyName)) {
//we will return original domain entity
//rather than proxy entity
return delegate.ATTACHED_OBJECT_ENTITIES[propertyName]
}
MetaProperty metaProperty = domainClass.metaClass.getMetaProperty(propertyName)
return metaProperty.getProperty(delegate)
}
}
|
Then do the logic as follows:
Account account = new Account()
account.id = 10
account.setAsCarbonCopy()

Order order = new Order()
order.account = account
// now no additional query will run
You can get order.account which will return above pojo entity as we modified our meta method. So any change on account and/or order.account will not automatically persist in our database as account is nothing but a pojo entity. And is not attach with session, we attached Account.proxy() with hibernate session, not pojo entity. |
Sunday, October 3, 2021
Flutter - design application with scrollbar enabled body with fixed header and footer | Header, Footer And Scrollable Body | How to create a scroll view with fixed footer with Flutter
|
A Flutter Widget that is scrollable with a sticky header to the header and footer to the bottom of screen of the end of the scroll body. You may simiply test with the example to see whether it is fit for your case. itemBuilder to build child widgets of scroll body; itemCount is the nunber of child widgets in scroll body.
Flutter is a mobile App SDK by Google which helps in creating Flutter: Material Design Using Scaffold AppBar Body Bottom Navigation Floating Action & Persistent Footer |
|
ListView is the most commonly used scrolling widget. It displays its children one after another in the scroll direction. In the cross axis, the children are required to fill the ListView.
The default constructor takes an explicit List The ListView.builder constructor takes an IndexedWidgetBuilder, which builds the children on demand. This constructor is appropriate for list views with a large (or infinite) number of children because the builder is called only for those children that are actually visible. |
| The ListView.separated constructor takes two IndexedWidgetBuilders: itemBuilder builds child items on demand, and separatorBuilder similarly builds separator children which appear in between the child items. This constructor is appropriate for list views with a fixed number of children. |
| ListView documentation |
| Full example as below: |
import 'package:flutter/material.dart';

void main() => runApp(new MyApp());

class MyApp extends StatelessWidget {
  // This widget is the root of your application.
  @override
  Widget build(BuildContext context) {
    return MaterialApp(
      title: 'Flutter Demo',
      theme: ThemeData(
        primarySwatch: Colors.blue,
      ),
      home: MyHomePage(),
    );
  }
}

class MyHomePage extends StatelessWidget {
  @override
  Widget build(BuildContext context) {
    return Scaffold(
        appBar: ApplicationAppBar(),
        body: MyHomePageImpl()
    );
  }
}

class MyHomePageImpl extends StatefulWidget {
  @override
  _MyHomePageImpl createState() => _MyHomePageImpl();
}

class _MyHomePageImpl extends State<MyHomePageImpl> {
  final Future<int> loadDataAsync = Future<int>.delayed(
    Duration(seconds: 1), () async => processDataAsync(),
  );

  static Future<int> processDataAsync() async {
    return 20;
  }

  @override
  Widget build(BuildContext context) {
    return Column(
      children: [
        SizedBox(height: 5),
        Container(
          width: double.infinity,
          padding: EdgeInsets.all(20),
          margin: EdgeInsets.fromLTRB(10, 10, 7, 10),
          child: Text("Fixed Header"),
          decoration: BoxDecoration(
              color: Colors.white,
              border: Border.all(
                color: Colors.red,
              ),
              borderRadius: BorderRadius.all(Radius.circular(10))
          ),
        ),
        Expanded(
          child: FutureBuilder(
            builder: (context, AsyncSnapshot snapshot) {
              if (snapshot.hasError) {
                return Center(
                  child: Column(
                    mainAxisAlignment: MainAxisAlignment.center,
                    crossAxisAlignment: CrossAxisAlignment.center,
                    children: [
                      Icon(
                        Icons.error_outline,
                        color: Colors.red,
                        size: 60,
                      ),
                      Padding(
                        padding: const EdgeInsets.only(top: 16),
                        child: Text('Error: ${snapshot.error}'),
                      )
                    ],
                  ),
                );
              }
              if (!snapshot.hasData) {
                return Center(
                  child: Column(
                    mainAxisAlignment: MainAxisAlignment.center,
                    crossAxisAlignment: CrossAxisAlignment.center,
                    children: [
                      SizedBox(height: 20),
                      SizedBox(
                        child: CircularProgressIndicator(),
                        width: 60,
                        height: 60,
                      ),
                      const Padding(
                        padding: EdgeInsets.only(top: 16),
                        child: Text('Awaiting result...'),
                      )
                    ],
                  ),
                );
              }
              return Column(
                children: [
                  Expanded(
                    child: Container(
                      padding: EdgeInsets.fromLTRB(0, 10, 0, 10),
                      margin: EdgeInsets.fromLTRB(10, 0, 10, 0),
                      decoration: BoxDecoration(
                          color: Colors.white,
                          border: Border.all(
                            color: Colors.red,
                          ),
                          borderRadius: BorderRadius.all(Radius.circular(10))
                      ),
                      child: ListView.builder(
                        physics: ScrollPhysics(),
                        shrinkWrap: true,
                        itemCount: snapshot.data,
                        itemBuilder: (BuildContext context, int index) {
                          return Padding(
                            padding: EdgeInsets.fromLTRB(10, 0, 10, 10),
                            child: Container(
                              padding: EdgeInsets.all(20),
                              decoration: BoxDecoration(
                                  color: Colors.white,
                                  border: Border.all(
                                    color: Colors.lightGreen,
                                  ),
                                  borderRadius: BorderRadius.all(Radius.circular(10))
                              ),
                              child: Center(
                                child: Text(
                                  'Child $index',
                                  style: TextStyle(color: Colors.black, fontSize: 22),
                                ),
                              ),
                            ),
                          );
                        },
                      ),
                    )
                  )
                ],
              );
            },
            future: loadDataAsync,
          ),
        ),
        Container(
          width: double.infinity,
          padding: EdgeInsets.all(20),
          margin: EdgeInsets.fromLTRB(10, 10, 10, 0),
          child: Text("Fixed Footer"),
          decoration: BoxDecoration(
              color: Colors.white,
              border: Border.all(
                color: Colors.red,
              ),
              borderRadius: BorderRadius.all(Radius.circular(10))
          ),
        ),
        SizedBox(height: 5),
      ],
    );
  }
}

class ApplicationAppBar extends AppBar {
  ApplicationAppBar() : super(
    title: Text("Fixed Header & Footer"),
    actions: [
      IconButton(icon: Icon(Icons.add), onPressed: () {}),
    ],
  );
}
|
Sample screenshot: 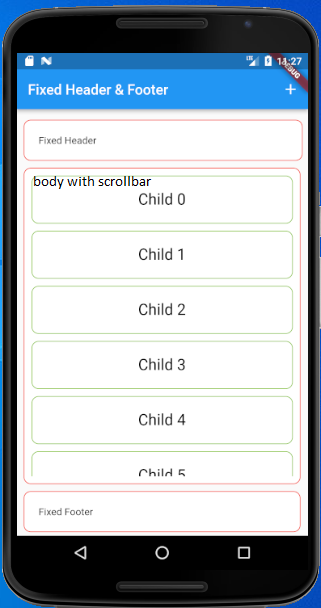 |
Subscribe to:
Posts (Atom)