| React doesn't have a resize event integrated into it, but we can listen to the native browser window resize event from within our React component. We will attach window resize event into componentDidMount method. |
| Under normal conditions, React will re-render a component when its props or state changes. To trigger a re-render of Component in the example, we'll set internal state on the component when the event is fired. So we can set/update state variable to tell React Component to update. We can implement method componentDidUpdate to acknoledged something changed. |
| When adding an event listener, such as we are for the resize event, we should make sure to clean up after ourselves. We will clean up any type of listener we added into method componentWillUnmount. |
| Example code given below: |
import React from "react";
import "./styles.css";

class App extends React.Component {
  constructor() {
    super();

    // we will update below state variables to tell react component
    // to update, only state or props change can update react component
    this.state = {
      width: 0,
      height: 0
    };

    // we will use this timer to less fire resize event
    // practially we will fire resize event 500 miliseconds after
    this.timer = null;

    // we will catch windows resize event into below function
    this.windowResized = this.windowResized.bind(this);

    // we will handle resize event so resize event will
    // be in some time interval, less freequent
    this.updateWindowWidth = this.updateWindowWidth.bind(this);
  }

  componentDidMount() {
    window.addEventListener("resize", this.windowResized);
    this.updateWindowWidth();
  }

  componentDidUpdate() {
    console.log(
      `Window width/height changed to ${this.state.width}X${this.state.height}`
    );
  }

  componentWillUnmount() {
    window.removeEventListener("resize", this.windowResized);
  }

  updateWindowWidth() {
    let _this = this;
    setTimeout(function() {
      _this.setState({
        width: window.innerWidth,
        height: window.innerHeight
      });
    });
  }

  windowResized() {
    let _this = this;
    if (this.timer) {
      clearTimeout(this.timer);
    }
    this.timer = setTimeout(function() {
      _this.updateWindowWidth();
    }, 500);
  }

  render() {
    return (
      <div className="App">
        <h1>
          WIDTH={this.state.width} HEIGHT={this.state.height}
        </h1>
      </div>
    );
  }
}

export default App;
|
Sample Image: 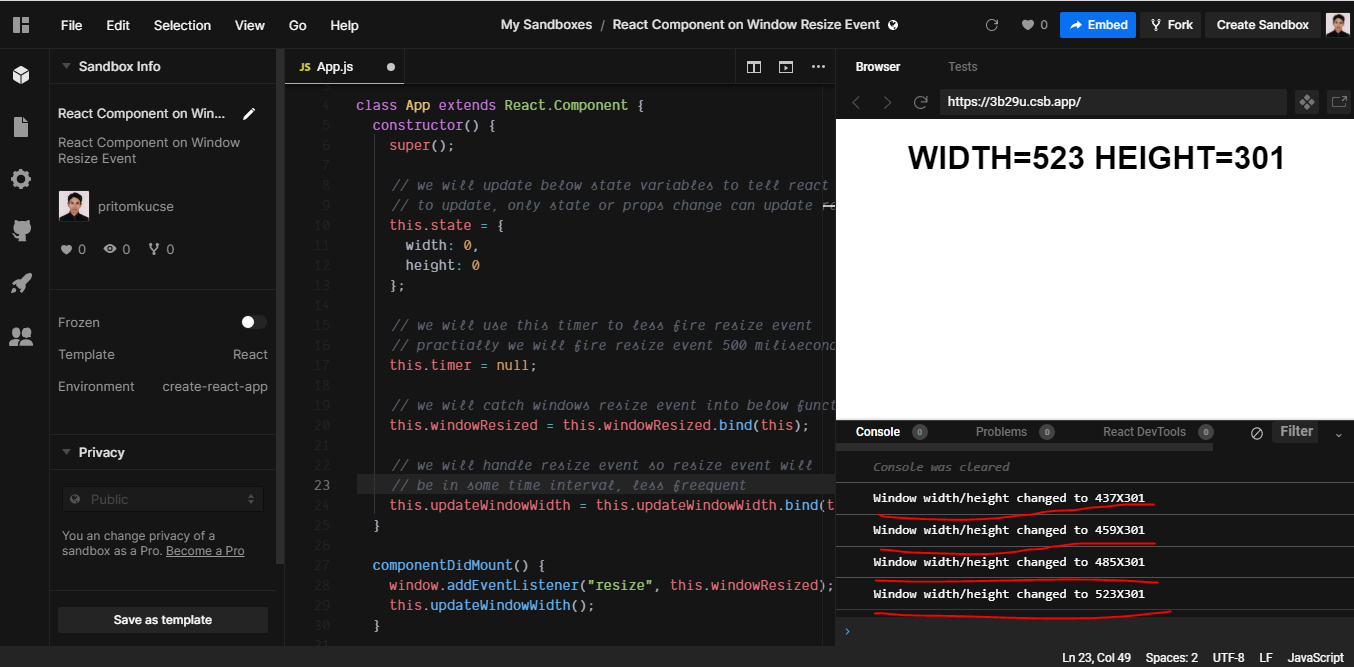 |
|
Live Example: https://codesandbox.io/s/react-component-on-window-resize-event-3b29u |
Thursday, March 12, 2020
React Component on Window Resize Event
Saturday, March 7, 2020
Lazy Loading React Components (with react.lazy and suspense)
|
Our first step is to create an React application using below command: npm init react-app react-lazy-loading-component Navigate to project folder and type npm start to start project on browser. Make sure you execute command npm run build to prepare build script which will be deployed on server  |
|
Route-based code splitting You have to install react-router-dom using npm install --save react-router-dom to use this functionality. Deciding where in your app to introduce code splitting can be a bit tricky. You want to make sure you choose places that will split bundles evenly, but won’t disrupt the user experience. A good place to start is with routes. Most people on the web are used to page transitions taking some amount of time to load. You also tend to be re-rendering the entire page at once so your users are unlikely to be interacting with other elements on the page at the same time. |
Sample App.js import {BrowserRouter as Router, Route, Switch} from 'react-router-dom'; import React, {Suspense, lazy} from 'react'; import './App.css'; import Header from './Header'; const Home = lazy(() => import('./Home')); const AnotherHome = lazy(() => import('./AnotherHome')); function App() { return ( <div> <Router> <Header/> <div className="container"> <Suspense fallback={<div>Loading...</div>}> <Switch> <Route exact path="/" component={Home}/> <Route exact path="/another-home" component={AnotherHome}/> </Switch> </Suspense> </div> </Router> </div> ); } export default App; |
| Actually use of Suspense and Lazy will load components chunk by chunk when they needed, and once a component loaded into browser will not load second time. |
 |
| GitHub Link https://github.com/pritomkucse/react-lazy-loading-component |
|
Live Example at codesandbox.io https://codesandbox.io/s/lazy-loading-react-components-with-reactlazy-and-suspense-2hx75 Make sure you see console to ensure that suspense callback working as expected:  |
Saturday, February 29, 2020
Laravel Migrations with MySQL 8.0.x - How to resolve the error: SQL authentication method unknown in Laravel-MySql
| By default and for some reason, mysql 8 default plugin is auth_socket. Applications will most times expect to log in to your database using a password. |
|
If you have not yet already changed your mysql default authentication plugin, you can do so by: 1. Log in as root to mysql 2. Run this sql command: ALTER USER 'root'@'localhost' IDENTIFIED WITH mysql_native_password BY 'password'; |
| Replace 'password' with your root password. In case your application does not log in to your database with the root user, replace the 'root' user in the above command with the user that your application uses. |
Windows Command Prompt - Change the default Command Prompt directory
| The change requires you to modify a value in the Registry. To do so press the Windows and R key at the same time to open up the run box on the system. Type in regedit and tap on the enter key on the keyboard to load the Registry Editor. You may receive an UAC prompt on newer versions of the operating system which you need to accept before the Registry Editor opens up. |
|
Navigate to the key HKEY_CURRENT_USER\Software\Microsoft\Command Processor and search for the String Autorun in the right window.If you can't find the parameter there right-click on Command Processor and select New > String. Name the string Autorun and click ok. Now double-click the new Autorun entry that you find on the right and enter the following string (as example). C:\Users\PRITOM\Desktop\MINE |

|
MySQL Installation With Error: Microsoft Visual C++ 2019 Redistributable Package (x64) is not installed. Latest binary compatible version will be installed if agreed to resolve this requirement.
| Microsoft Visual C++ 2019 Redistributable Package (x64) is not installed. Latest binary compatible version will be installed if agreed to resolve this requirement. |
| You need to download latest Microsoft Visual C++ Redistributable Package to resolve the problem. |
| You can download latest one from https://www.microsoft.com/en-us/download/details.aspx?id=48145 |
Tuesday, February 25, 2020
CSS Aligning Last Item to the Bottom of a Container Using Flex Attribute
| The ordered list has its initial layout controlled by a row flexbox layout and the list items are controlled by a column flexbox layout. |
Containing ul tag flexbox CSS is… ul { display: flex; flex-flow: row wrap; justify-content: flex-start; } |
Markup for the list item is…<li> <h3>Header</h3> <p class="price"><sup>$</sup>100</p> <p class="details">CSS Aligning Last Item</p> <a class="button" href=""><p>Buy Now</p></a> </li> |
The Flexbox CSS for the li tag is…li { display: flex; flex-flow: column nowrap; margin-top: auto; } |
 |
| JSFiddle Example Link |
Saturday, February 22, 2020
PHP is not recognized as an internal or external command in command prompt
|
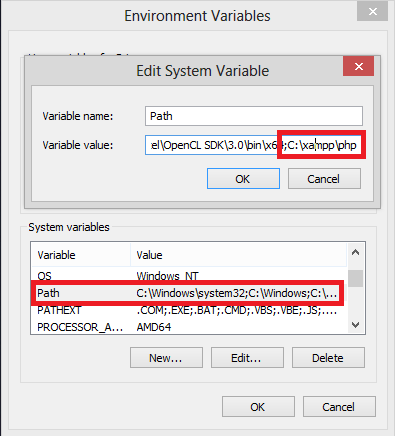
Need to add C:\xampp\php to your PATH environment variable. Then close your command prompt and restart again. It is very important because if you do not restart your command prompt then changes will not be reflected. |
|
Go to My Computer->properties -> Advanced system setting
Now click on Environment Variables  |
Add ;C:\xampp\php in path variable value
 |
|
Now restart command prompt DONE!
Note: Make sure you run CMD via run as administrator |
Subscribe to:
Posts (Atom)