| A view composer is exactly what you're looking for. A view composer allows you to tell your application do x when view y is rendered. For example when pages.buy is rendered anywhere in my application attach $articles. |
| The main thing is to create a service provider under "project/app/Providers" folder as below: |
<?php namespace App\Providers; use Illuminate\Support\ServiceProvider; class AppServiceProvider extends ServiceProvider { /** * Bootstrap any application services. * * @return void */ public function boot() { view()->composer('*', function($view) { $view->with('isAdmin', true); $view->with('isSupervisor', false); }); /* Make sure you have a view named "index.blade.ctp" in a folder named "customFolder" under "project/resources/views" folder. */ view()->composer(array("customFolder.index"), function($view) { $view->with("xor", "XOR-1"); }); } /** * Register any application services. * * @return void */ public function register() { // } } |
Friday, February 8, 2019
How to pass data to all views in Laravel 5 | Sharing Data Between Views Using Laravel View Composers | Laravel 5.3 - Sharing $user variable in all views | Passing data to all views | View Composer to pass variable to all views | Passing $variables to multiple views
Laravel :: Getting url() in a Command returns http://localhost | URL problem with queued jobs | Url helper functions that are relative to application url config | Localhost url problems
| First need to configure project/config/app.php as below: |
/* |-------------------------------------------------------------------------- | Application URL |-------------------------------------------------------------------------- | | This URL is used by the console to properly generate URLs when using | the Artisan command line tool. You should set this to the root of | your application so that it is used when running Artisan tasks. | */ 'url' => 'http://localhost:81/my_project/' |
| Now need to edit project/app/Providers/AppServiceProvider.php as below: |
namespace App\Providers;

use Illuminate\Support\Facades\URL;
use Illuminate\Support\Facades\Config;
use Illuminate\Support\ServiceProvider;


class AppServiceProvider extends ServiceProvider
{
    private static $logStream;


    /**
     * Bootstrap any application services.
     *
     * @return void
     */
    public function boot()
    {
        URL::forceRootUrl(Config::get('app.url'));
    }
}
|
Override setGlobalTo of Laravel Mailer| Laravel Message Sending listener | Laravel Mail Sending Listener | How to create Event for Mail sending in Laravel 5
| We need to create event listener for "Illuminate\Mail\Events\MessageSending" event. So our listener file would be under "project/app/Listeners" as below. |
<?php namespace App\Listeners; use Illuminate\Support\Facades\Log; use Illuminate\Mail\Events\MessageSending; class MessageSendingListener { public function __construct() { } public function handle(MessageSending $swiftMessage) { $server = env("MODE", "LIVE"); if ($server != "LIVE") { $swiftMessage->message->setSubject($swiftMessage->message->getSubject() . " ($server)"); } Log::info("SENDING EMAIL=".$swiftMessage->message->getSubject()); } } |
| The above file will be called before each mail be send. So we can modify or check anything as global option. |
| Now we require to register event on EventServiceProvider.php file so, open app/Providers/EventServiceProvider.php and copy this code and put in your file. |
<?php namespace App\Providers; use Illuminate\Contracts\Events\Dispatcher as DispatcherContract; use Illuminate\Foundation\Support\Providers\EventServiceProvider as ServiceProvider; class EventServiceProvider extends ServiceProvider { /** * The event listener mappings for the application. * * @var array */ protected $listen = [ 'App\Events\SomeEvent' => [ 'App\Listeners\EventListener', ], 'Illuminate\Mail\Events\MessageSending' => [ 'App\Listeners\MessageSendingListener', ], ]; /** * Register any other events for your application. * * @param \Illuminate\Contracts\Events\Dispatcher $events * @return void */ public function boot(DispatcherContract $events) { parent::boot($events); // } } |
| This is all. |
Laravel, get last insert id using Eloquent | laravel 5.2 get insert id from eloquent model | Get Last Inserted ID With Example
| We have needed some it last inserted ID in Laravel application. so, here we have find 4 different way to get last inserted ID in Laravel. you can use it and get last ID of inserted record in Laravel application. |
| Using lastInsertId() method |
DB::table('users')->insert([
    'name' => 'TestName'
]);
$id = DB::getPdo()->lastInsertId();
|
| Using create() method |
$data = User::create(['name'=>'first']); $id = $data->id; |
| Using save() method |
$data = new User; $data->name = 'Test'; $data->save(); $id = $data->id; |
| Using insertGetId() method |
$id = DB::table('users')->insertGetId([
    'name' => 'first'
]);
|
Middleware when running Artisan console request
| I want a custom piece of middleware to run whenever I run an artisan command. I need to set a few environment variables to be used in the app configuration before the actual command executes. |
| There is a way around but not sure if the correct one, but works. Just open up the Kernel class and override the bootstrap method. Laravel 5.3, have not tested on other versions, but should work similarly |
<?php namespace App\Console; use Log; use Illuminate\Console\Scheduling\Schedule; use Illuminate\Foundation\Console\Kernel as ConsoleKernel; class Kernel extends ConsoleKernel { /** * The Artisan commands provided by your application. * * @var array */ protected $commands = [ Commands\Inspire::class, ]; public function bootstrap() { parent::bootstrap(); Log::info("KERNEL COMMAND EXECUTING"); } /** * Define the application's command schedule. * * @param \Illuminate\Console\Scheduling\Schedule $schedule * @return void */ protected function schedule(Schedule $schedule) { $schedule->call('App\Service\YourService@method')->dailyAt('10:00'); $schedule->call('App\Service\YourService@method')->everyFiveMinutes(); } } |
| And finally the Kernel is executed by CronJob or Laravel Jobs. |
| To add Laravel kernel scheduler to CronJob, execute command crontab -e and add below line and save the operation. |
| * * * * * /usr/local/bin/php /project_location/www/project/artisan schedule:run >> /dev/null 2>&1 |
Sunday, December 30, 2018
Generate a Report using Crystal Reports in Visual Studio 2015, C# Crystal Reports without database, C# Crystal Reports with Sub Report, C# Crystal Reports using DataSet and DataTable, C# Crystal Reports using Strongly Typed DataSet
| Since a long time, Visual Basic and Visual Studio have Crystal report with it. People are saying that since 1993. But in VS2010, they excluded Crystal reports. Yes, what you just heard is right, Crystal Report has been dropped from Visual Studio 2010. But don't worry, it is available as a separate download from the SAP web site. These are the things that I found from the internet. And now I am going to use VS2015 |
| First need to create an project. Then need to create Crystal Report as below: |
    |
| Below image is for sub report: |
 |
| Below image is showing how to insert an Sub Report to Main Report: |
 |
| Below image is for our DataSet, as we are not using DataBase: |
using CrystalDecisions.CrystalReports.Engine; using CrystalDecisions.Shared; using System.Data; using System.IO; using System.Web.Mvc; namespace WebApplication1.Controllers { public class MyController : Controller { private ReportDocument report = new ReportDocument(); // GET: My public ActionResult Index() { return View("View1"); } public ActionResult Export() { ReportDocument rd = new ReportDocument(); rd.Load(Path.Combine(Server.MapPath("~/Reports/CrystalReport1.rpt"))); DataTable dataTable = new DataTable(); dataTable.Columns.Add("Id"); dataTable.Columns.Add("Name"); dataTable.Columns.Add("Roll"); for (int index = 1; index <= 10; index++) { DataRow r = dataTable.NewRow(); r["Id"] = index; r["Name"] = "Name - " + index; r["Roll"] = "Roll - " + index; dataTable.Rows.Add(r); } rd.Database.Tables["DataTable1"].SetDataSource((DataTable)dataTable); dataTable = new DataTable(); dataTable.Columns.Add("SchoolName"); dataTable.Columns.Add("ExamYear"); dataTable.Columns.Add("Class"); DataRow r2 = dataTable.NewRow(); r2["SchoolName"] = "My School"; r2["ExamYear"] = "2008/2009"; r2["Class"] = "Class 9"; dataTable.Rows.Add(r2); rd.Database.Tables["SingleData"].SetDataSource((DataTable)dataTable); Response.Buffer = false; Response.ClearContent(); Response.ClearHeaders(); Stream stream = rd.ExportToStream(ExportFormatType.PortableDocFormat); stream.Seek(0, SeekOrigin.Begin); return File(stream, "application/pdf", "My.pdf"); } } } |
| Below is sample output: |
 |
| You can download source code from here |
Saturday, December 1, 2018
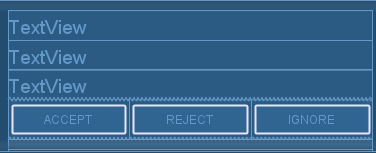
Android How to create Buttons of equal width in a row on any Screen width | How to implement linearlayout with 2 buttons, Horizontal and Vertical | Set two buttons to same width regardless of screen size
| It is a common requirement to layout a bunch of buttons side by side. Making them of equal width is just plain good GUI design. |
| To achieve the effect above, first create a LinearLayout just for the buttons. The layout will contain three buttons. |
<LinearLayout android:id="@+id/linearLayout1" android:layout_height="wrap_content" android:layout_width="fill_parent"> <Button android:id="@+id/button_accept" android:text="Accept" android:layout_weight="1" android:layout_height="40sp" android:layout_width="0dp"/> <Button android:id="@+id/button_reject" android:text="Reject" android:layout_weight="1" android:layout_height="40sp" android:layout_width="0dp"/> <Button android:id="@+id/button_ignore" android:text="Ignore" android:layout_weight="1" android:layout_height="40sp" android:layout_width="0dp"/> </LinearLayout> |
|
We took these steps to get the effect: 1. For the LinearLayout we set android:layout_width="fill_parent". This causes the layout view to take up the full width available from the device. 2. For each Button, we set android:layout_width="fill_parent" and android:layout_weight="1". |
 |
Subscribe to:
Posts (Atom)