| We need to create event listener for "Illuminate\Mail\Events\MessageSending" event. So our listener file would be under "project/app/Listeners" as below. |
<?php namespace App\Listeners; use Illuminate\Support\Facades\Log; use Illuminate\Mail\Events\MessageSending; class MessageSendingListener { public function __construct() { } public function handle(MessageSending $swiftMessage) { $server = env("MODE", "LIVE"); if ($server != "LIVE") { $swiftMessage->message->setSubject($swiftMessage->message->getSubject() . " ($server)"); } Log::info("SENDING EMAIL=".$swiftMessage->message->getSubject()); } } |
| The above file will be called before each mail be send. So we can modify or check anything as global option. |
| Now we require to register event on EventServiceProvider.php file so, open app/Providers/EventServiceProvider.php and copy this code and put in your file. |
<?php namespace App\Providers; use Illuminate\Contracts\Events\Dispatcher as DispatcherContract; use Illuminate\Foundation\Support\Providers\EventServiceProvider as ServiceProvider; class EventServiceProvider extends ServiceProvider { /** * The event listener mappings for the application. * * @var array */ protected $listen = [ 'App\Events\SomeEvent' => [ 'App\Listeners\EventListener', ], 'Illuminate\Mail\Events\MessageSending' => [ 'App\Listeners\MessageSendingListener', ], ]; /** * Register any other events for your application. * * @param \Illuminate\Contracts\Events\Dispatcher $events * @return void */ public function boot(DispatcherContract $events) { parent::boot($events); // } } |
| This is all. |
Friday, February 8, 2019
Override setGlobalTo of Laravel Mailer| Laravel Message Sending listener | Laravel Mail Sending Listener | How to create Event for Mail sending in Laravel 5
Laravel, get last insert id using Eloquent | laravel 5.2 get insert id from eloquent model | Get Last Inserted ID With Example
| We have needed some it last inserted ID in Laravel application. so, here we have find 4 different way to get last inserted ID in Laravel. you can use it and get last ID of inserted record in Laravel application. |
| Using lastInsertId() method |
DB::table('users')->insert([
    'name' => 'TestName'
]);
$id = DB::getPdo()->lastInsertId();
|
| Using create() method |
$data = User::create(['name'=>'first']); $id = $data->id; |
| Using save() method |
$data = new User; $data->name = 'Test'; $data->save(); $id = $data->id; |
| Using insertGetId() method |
$id = DB::table('users')->insertGetId([
    'name' => 'first'
]);
|
Middleware when running Artisan console request
| I want a custom piece of middleware to run whenever I run an artisan command. I need to set a few environment variables to be used in the app configuration before the actual command executes. |
| There is a way around but not sure if the correct one, but works. Just open up the Kernel class and override the bootstrap method. Laravel 5.3, have not tested on other versions, but should work similarly |
<?php namespace App\Console; use Log; use Illuminate\Console\Scheduling\Schedule; use Illuminate\Foundation\Console\Kernel as ConsoleKernel; class Kernel extends ConsoleKernel { /** * The Artisan commands provided by your application. * * @var array */ protected $commands = [ Commands\Inspire::class, ]; public function bootstrap() { parent::bootstrap(); Log::info("KERNEL COMMAND EXECUTING"); } /** * Define the application's command schedule. * * @param \Illuminate\Console\Scheduling\Schedule $schedule * @return void */ protected function schedule(Schedule $schedule) { $schedule->call('App\Service\YourService@method')->dailyAt('10:00'); $schedule->call('App\Service\YourService@method')->everyFiveMinutes(); } } |
| And finally the Kernel is executed by CronJob or Laravel Jobs. |
| To add Laravel kernel scheduler to CronJob, execute command crontab -e and add below line and save the operation. |
| * * * * * /usr/local/bin/php /project_location/www/project/artisan schedule:run >> /dev/null 2>&1 |
Sunday, December 30, 2018
Generate a Report using Crystal Reports in Visual Studio 2015, C# Crystal Reports without database, C# Crystal Reports with Sub Report, C# Crystal Reports using DataSet and DataTable, C# Crystal Reports using Strongly Typed DataSet
| Since a long time, Visual Basic and Visual Studio have Crystal report with it. People are saying that since 1993. But in VS2010, they excluded Crystal reports. Yes, what you just heard is right, Crystal Report has been dropped from Visual Studio 2010. But don't worry, it is available as a separate download from the SAP web site. These are the things that I found from the internet. And now I am going to use VS2015 |
| First need to create an project. Then need to create Crystal Report as below: |
    |
| Below image is for sub report: |
 |
| Below image is showing how to insert an Sub Report to Main Report: |
 |
| Below image is for our DataSet, as we are not using DataBase: |
using CrystalDecisions.CrystalReports.Engine; using CrystalDecisions.Shared; using System.Data; using System.IO; using System.Web.Mvc; namespace WebApplication1.Controllers { public class MyController : Controller { private ReportDocument report = new ReportDocument(); // GET: My public ActionResult Index() { return View("View1"); } public ActionResult Export() { ReportDocument rd = new ReportDocument(); rd.Load(Path.Combine(Server.MapPath("~/Reports/CrystalReport1.rpt"))); DataTable dataTable = new DataTable(); dataTable.Columns.Add("Id"); dataTable.Columns.Add("Name"); dataTable.Columns.Add("Roll"); for (int index = 1; index <= 10; index++) { DataRow r = dataTable.NewRow(); r["Id"] = index; r["Name"] = "Name - " + index; r["Roll"] = "Roll - " + index; dataTable.Rows.Add(r); } rd.Database.Tables["DataTable1"].SetDataSource((DataTable)dataTable); dataTable = new DataTable(); dataTable.Columns.Add("SchoolName"); dataTable.Columns.Add("ExamYear"); dataTable.Columns.Add("Class"); DataRow r2 = dataTable.NewRow(); r2["SchoolName"] = "My School"; r2["ExamYear"] = "2008/2009"; r2["Class"] = "Class 9"; dataTable.Rows.Add(r2); rd.Database.Tables["SingleData"].SetDataSource((DataTable)dataTable); Response.Buffer = false; Response.ClearContent(); Response.ClearHeaders(); Stream stream = rd.ExportToStream(ExportFormatType.PortableDocFormat); stream.Seek(0, SeekOrigin.Begin); return File(stream, "application/pdf", "My.pdf"); } } } |
| Below is sample output: |
 |
| You can download source code from here |
Saturday, December 1, 2018
Android How to create Buttons of equal width in a row on any Screen width | How to implement linearlayout with 2 buttons, Horizontal and Vertical | Set two buttons to same width regardless of screen size
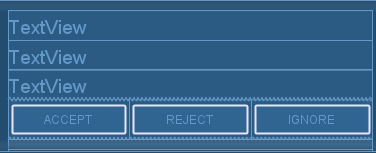
| It is a common requirement to layout a bunch of buttons side by side. Making them of equal width is just plain good GUI design. |
| To achieve the effect above, first create a LinearLayout just for the buttons. The layout will contain three buttons. |
<LinearLayout android:id="@+id/linearLayout1" android:layout_height="wrap_content" android:layout_width="fill_parent"> <Button android:id="@+id/button_accept" android:text="Accept" android:layout_weight="1" android:layout_height="40sp" android:layout_width="0dp"/> <Button android:id="@+id/button_reject" android:text="Reject" android:layout_weight="1" android:layout_height="40sp" android:layout_width="0dp"/> <Button android:id="@+id/button_ignore" android:text="Ignore" android:layout_weight="1" android:layout_height="40sp" android:layout_width="0dp"/> </LinearLayout> |
|
We took these steps to get the effect: 1. For the LinearLayout we set android:layout_width="fill_parent". This causes the layout view to take up the full width available from the device. 2. For each Button, we set android:layout_width="fill_parent" and android:layout_weight="1". |
 |
Saturday, November 10, 2018
Wkhtmltopdf Characters in single line partially cut between pages
| In some pages, characters in single line partially cut between pages. When I convert html convert to pdf using pdfkit gem. I am using wkhtmltox-0.12.4_msvc2015-win32 version. |
| My Pdf getting cut at below image: |
 |
|
Then I added this to my CSS: table, img, div {page-break-inside: avoid;} |
| Not it got fixed as below image: |
 |
Friday, October 26, 2018
Android: ActionBar (Top Title Bar) with Custom View (Using Custom Layout as App Title) Example with Top Navigation View Example
| n this tutorial, we will create an example to customize ActionBar with a custom layout in Android. Before we begin, I assume you already have created an Android application. BELOW THERE IS FULL SOURCE CODE |
|
1. Main layout file:
*** android.support.v7.widget.Toolbar will be replaced by our custom action bar |
<?xml version="1.0" encoding="utf-8"?> <!-- Use DrawerLayout as root container for activity --> <android.support.v4.widget.DrawerLayout xmlns:android="http://schemas.android.com/apk/res/android" xmlns:app="http://schemas.android.com/apk/res-auto" android:id="@+id/drawer_layout" android:layout_width="match_parent" android:layout_height="match_parent" android:fitsSystemWindows="true"> <!-- Layout to contain contents of main body of screen (drawer will slide over this) --> <FrameLayout android:id="@+id/content_frame" android:layout_width="match_parent" android:layout_height="match_parent" android:background="#fff"> <android.support.v7.widget.Toolbar android:id="@+id/toolbar" android:layout_width="match_parent" android:layout_height="?attr/actionBarSize" android:background="#FF4081" android:theme="@style/ThemeOverlay.AppCompat.ActionBar" /> </FrameLayout> <!-- Container for contents of drawer - use NavigationView to make configuration easier --> <android.support.design.widget.NavigationView android:id="@+id/nav_view" android:layout_width="wrap_content" android:layout_height="match_parent" android:layout_gravity="start" android:fitsSystemWindows="true" app:menu="@menu/navigation" app:headerLayout="@layout/nav_header" /> <LinearLayout xmlns:android="http://schemas.android.com/apk/res/android" xmlns:tools="http://schemas.android.com/tools" android:layout_width="match_parent" android:layout_height="wrap_content" android:orientation="vertical" tools:context="pkm.com.customTitleBar.MainActivity" android:paddingTop="60dp"> <ScrollView style="@android:style/Widget.ScrollView" android:layout_width="match_parent" android:layout_height="0dip" android:layout_gravity="top" android:layout_weight="1" android:fillViewport="false" android:scrollbarStyle="insideInset"> <LinearLayout android:id="@+id/mainLayoutScrollView" android:layout_width="match_parent" android:layout_height="wrap_content" android:orientation="vertical"> </LinearLayout> </ScrollView> <LinearLayout android:id="@+id/mainViewBottomBar" android:layout_width="match_parent" android:layout_height="wrap_content" android:minHeight="20dp" android:orientation="vertical"> </LinearLayout> </LinearLayout> </android.support.v4.widget.DrawerLayout> |
|
2. Sample AndroidManifest.xml *** Turned off default action bar using > android:theme="@style/AppTheme.NoActionBar" |
<?xml version="1.0" encoding="utf-8"?> <manifest xmlns:android="http://schemas.android.com/apk/res/android" package="pkm.com.customTitleBar"> <application android:allowBackup="true" android:icon="@mipmap/ic_launcher" android:label="@string/app_name" android:roundIcon="@mipmap/ic_launcher_round" android:supportsRtl="true" android:theme="@style/AppTheme"> <activity android:name=".MainActivity" android:label="@string/app_name" android:theme="@style/AppTheme.NoActionBar"> <intent-filter> <action android:name="android.intent.action.MAIN" /> <category android:name="android.intent.category.LAUNCHER" /> </intent-filter> </activity> </application> </manifest> |
| *** android:theme="@style/AppTheme.NoActionBar" is defined in RES/VALUES/STYLES.XML as BELOW |
<resources> <!-- Base application theme. --> <style name="AppTheme" parent="Theme.AppCompat.Light.DarkActionBar"> <!-- Customize your theme here. --> <item name="colorPrimary">@color/colorPrimary</item> <item name="colorPrimaryDark">@color/colorPrimaryDark</item> <item name="colorAccent">@color/colorAccent</item> </style> <style name="AppTheme.NoActionBar"> <item name="windowActionBar">false</item> <item name="windowNoTitle">true</item> </style> </resources> |
| 3. Below is navigation.xml used in our main layout file: |
<?xml version="1.0" encoding="utf-8"?> <menu xmlns:android="http://schemas.android.com/apk/res/android"> <item android:id="@+id/navigation_home" android:icon="@drawable/ic_home_black_24dp" android:title="@string/title_home" /> <item android:id="@+id/navigation_dashboard" android:icon="@drawable/ic_dashboard_black_24dp" android:title="@string/title_dashboard" /> <item android:id="@+id/navigation_notifications" android:icon="@drawable/ic_notifications_black_24dp" android:title="@string/title_notifications" /> </menu> |
| 4. Below is nav_header.xml used in our main layout: |
<?xml version="1.0" encoding="utf-8"?> <LinearLayout xmlns:android="http://schemas.android.com/apk/res/android" android:layout_width="match_parent" android:layout_height="80dp" android:background="?attr/colorPrimaryDark" android:padding="16dp" android:theme="@style/ThemeOverlay.AppCompat.Dark" android:orientation="vertical" android:gravity="bottom"> <TextView android:layout_width="match_parent" android:layout_height="wrap_content" android:text="@string/app_name" android:textAppearance="@style/TextAppearance.AppCompat.Body1"/> </LinearLayout> |
| 5. Below is main title bar we using in our app: |
<?xml version="1.0" encoding="utf-8"?> <RelativeLayout xmlns:android="http://schemas.android.com/apk/res/android" android:layout_width="match_parent" android:layout_height="wrap_content" > <TextView android:id="@+id/title_text" android:layout_width="match_parent" android:layout_height="50dp" android:layout_alignParentStart="true" android:textAllCaps="true" android:text="@string/app_name" android:textAppearance="?android:attr/textAppearanceLarge" android:textColor="#fff" android:textStyle="bold" android:layout_marginStart="0dp" android:padding="10dp" android:paddingEnd="0dp" android:layout_marginEnd="85dp" android:background="@drawable/border" /> <ImageView android:id="@+id/imageView1" android:layout_width="35dp" android:layout_height="35dp" android:layout_alignParentEnd="true" android:layout_centerVertical="true" android:layout_marginEnd="45dp" android:src="@drawable/ic_drawer_menu" /> <ImageButton android:id="@+id/imageButton" android:layout_width="wrap_content" android:layout_height="wrap_content" android:layout_alignParentEnd="true" android:layout_centerVertical="true" android:layout_marginEnd="8dp" android:background="@null" android:src="@android:drawable/ic_menu_rotate" /> </RelativeLayout> |
| 6. Below is our main activity class: |
package pkm.com.customTitleBar; import android.content.Context; import android.graphics.Bitmap; import android.graphics.Color; import android.graphics.PorterDuff; import android.graphics.drawable.BitmapDrawable; import android.graphics.drawable.Drawable; import android.os.Bundle; import android.support.design.widget.NavigationView; import android.support.v4.view.GravityCompat; import android.support.v4.widget.DrawerLayout; import android.support.v7.app.ActionBar; import android.support.v7.app.AppCompatActivity; import android.support.v7.widget.Toolbar; import android.view.LayoutInflater; import android.view.MenuItem; import android.view.View; public class MainActivity extends AppCompatActivity { private DrawerLayout mDrawerLayout = null; @Override protected void onCreate(Bundle savedInstanceState) { super.onCreate(savedInstanceState); setContentView(R.layout.main_activity); mDrawerLayout = findViewById(R.id.drawer_layout); NavigationView navigationView = findViewById(R.id.nav_view); navigationView.setNavigationItemSelectedListener( new NavigationView.OnNavigationItemSelectedListener() { @Override public boolean onNavigationItemSelected(MenuItem menuItem) { // set item as selected to persist highlight menuItem.setChecked(true); // close drawer when item is tapped mDrawerLayout.closeDrawers(); // Add code here to update the UI based on the item selected // For example, swap UI fragments here return true; } }); Toolbar toolbar = findViewById(R.id.toolbar); setSupportActionBar(toolbar); ActionBar actionbar = getSupportActionBar(); //actionbar.setDisplayHomeAsUpEnabled(true); //actionbar.setHomeAsUpIndicator(R.drawable.ic_drawer_menu); Drawable drawable= getResources().getDrawable(R.drawable.ic_drawer_menu); Bitmap bitmap = ((BitmapDrawable) drawable).getBitmap(); Drawable newDrawable = new BitmapDrawable(getResources(), Bitmap.createScaledBitmap(bitmap, 120, 120, true)); newDrawable.setColorFilter(Color.WHITE, PorterDuff.Mode.SRC_ATOP); actionbar.setDisplayHomeAsUpEnabled(true); actionbar.setHomeAsUpIndicator(newDrawable); View v = getLinearLayoutById(R.layout.main_title_bar); actionbar.setCustomView(v); actionbar.setDisplayShowCustomEnabled(true); } public View getLinearLayoutById(int id) { LayoutInflater inflater = (LayoutInflater) this.getSystemService(Context.LAYOUT_INFLATER_SERVICE); return inflater.inflate(id, null); } @Override public boolean onOptionsItemSelected(MenuItem item) { switch (item.getItemId()) { case android.R.id.home: mDrawerLayout.openDrawer(GravityCompat.START); return true; } return super.onOptionsItemSelected(item); } } |
 |
 |
|
CLICK HERE TO DOWNLOAD FULL EXAMPLE |
Subscribe to:
Posts (Atom)