Friday, June 16, 2017

Laravel 5.X: Access HTTP Request From Controller | Service

It's very important to access HTTP Request from Laravel Controller or Service. Below is a code example showing how to access HTTP Request from Laravel Controller. Same for Service.


<?php

namespace App\Http\Controllers;

use Illuminate\Http\Request as HttpRequest;
use Illuminate\Routing\Controller as BaseController;

class HomeController extends BaseController
{
    private $HttpRequest;
    public function __construct(HttpRequest $HttpRequest)
    {
        $this->HttpRequest = $HttpRequest;
    }

    public function checkHttpRequest() {
        echo $this->HttpRequest->get("id") . "<BR>";
        echo $this->HttpRequest->getBaseUrl() . "<BR>";
        echo $this->HttpRequest->getUri();
        die();
    }
}


Instagram: How to get images using Instagram API

You can develop a web-app to show Instagram images/photos from other users accounts using API call. Instagram API is the easiest so far to me. At first you have to visit https://www.instagram.com/developer/ to create a developer account and then an application for API communication as below steps:

The most important link is https://www.instagram.com/developer which describes API procedures.


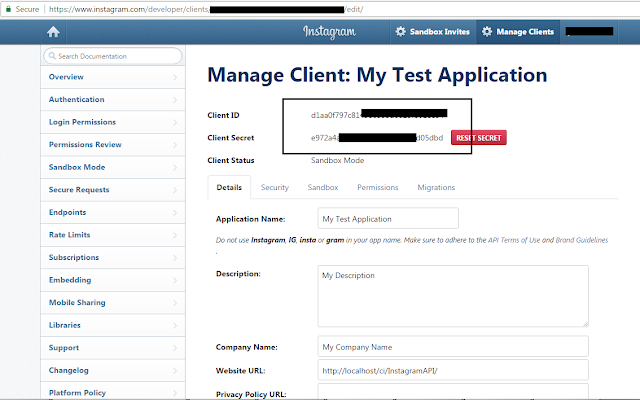
You can create a Application and then you have client id and client secret as below screenshot.


Below is the full PHP code snippet to get images/photos from Instagram using API call:


<?php
session_start();

include_once "CurlExecutor.php";

define("CLIENT_ID", "d1aa0f7.............................");
define("CLIENT_SECRET", "e972a4a.........................");
define("REDIRECT_URI", "http://localhost/ci/InstagramAPI/");

if (isset($_SESSION["access_token"])) {
    getRecentPhotos();
}
elseif (isset($_GET["code"])) {
    getAccessToken();
}
else {
    authentication();
}

function getRecentPhotos() {
    $user_id = $_SESSION["user_id"];
    $url = "https://api.instagram.com/v1/users/$user_id/media/recent/";
    $url = $url . "?access_token=" . $_SESSION["access_token"];
    $url = $url . "&count=5";
    $response = CurlExecutor::execute($url);
    $response["response"] = json_decode($response["response"]);
    if ($response["code"] != 200) {
        die("ERROR");
    }
    foreach ($response["response"]->data as $o) {
        echo "<a target='_blank' href='" . $o->link . "'>";
        echo "<img src='" . $o->images->low_resolution->url . "'/>";
        echo "</a>";
    }
}

function getAccessToken() {
    $post = array(
        "client_id" => CLIENT_ID,
        "client_secret" => CLIENT_SECRET,
        "grant_type" => "authorization_code",
        "redirect_uri" => REDIRECT_URI,
        "code" => $_GET["code"]
    );
    $response = CurlExecutor::execute("https://api.instagram.com/oauth/access_token", "POST", $post);
    $response["response"] = json_decode($response["response"]);
    CurlExecutor::prettyPrint($response);
    if ($response["code"] != 200) {
        die("ERROR");
    }
    $_SESSION["access_token"] = $response["response"]->access_token;
    $_SESSION["user_id"] = $response["response"]->user->id;
    header("Refresh:0; url=" . REDIRECT_URI);
}

function authentication() {
    $auth_url = "https://api.instagram.com/oauth/authorize/?" .
        "client_id=" . CLIENT_ID .
        "&redirect_uri=" . REDIRECT_URI .
        "&response_type=code";
    header("Refresh:0; url=$auth_url");
    exit();
}
?>

Authorization screen is as below screenshots (User will authorize this application and then forwarded to redirect URI with a one time code, you can use that code to get access token, and then you can get users photos as well as users basic info using those access token):


And output is as below:


Thursday, June 15, 2017

How to Upload Photo to Instagram with a Web Browser

How to Upload Photo to Instagram with a Web Browser? it's easy. Below are some screenshots available. At first you have to login to your Instagram account.


MySQL UPDATE with SUBQUERY of same table

I want to update a table named "test" with some sub-query where sub-query is the same "test" table. I wrote the below SQL first to update my "test" table:

UPDATE test SET roll=CONCAT(roll,"-",id) WHERE id IN (SELECT id FROM test WHERE id%2=0)

And got below error:

#1093 - Table 'test' is specified twice, both as a target for 'UPDATE' and as a separate source for data.

And in this case we have a nice solution provided by MySQL itself is processing temporary table, query is below:

UPDATE test SET roll=CONCAT(roll,"-",id) WHERE id IN (SELECT t.id FROM (SELECT * FROM test) AS t WHERE t.id%2=0)

And it works. Marked yellow color section actually do the temporary table works.

GIT: Create and push a new local branch to a remote Git repository and tracking information | GIT Delete Local Branch | GIT Delete Remote Branch

What we have to do first need to create a local branch from current working branch using below command:

git checkout -b my_branch

And then have to execute below command to push newly created branch to git repository:

git push -u origin my_branch

And then you need to set your upstream branch to pull changes:

git branch --set-upstream-to=origin/my_branch

Below command is to delete a local branch:

git branch -D my_branch

Below command is to delete a remote branch:

git push origin --delete my_branch

MySQL Insert with While Loop | Use LOOP variable for INSERT in MySQL | INSERT using a procedure variable

Use while loop in MySQL is now very easy. It can be achieved by MySQL Procedure execution. We can all type of operation here and all type of condition checking like if, do while, else if and many more. Below is a simple code snippet to describe basic implementation of MySQL Procedure.


DELIMITER //
DROP PROCEDURE IF EXISTS doWhile;
CREATE PROCEDURE doWhile()
  BEGIN
    DECLARE i INT DEFAULT (SELECT COUNT(*) FROM HOME);
    DECLARE j INT DEFAULT i + 2;
    WHILE (i < j) DO
      INSERT INTO HOME (name, roll) VALUES (CONCAT("Name-", i), CONCAT("ROLL-", i));
      SET i = i + 1;
    END WHILE;
  END;
//
CALL doWhile();

DELIMITER //
DROP PROCEDURE IF EXISTS doWhile;
CREATE PROCEDURE doWhile()
  BEGIN
    DECLARE namex VARCHAR(300);
    DECLARE rollx VARCHAR(300);
    DECLARE cursor1 CURSOR FOR (SELECT name,roll FROM HOME WHERE id % 2 = 0);

    OPEN cursor1;
    read_loop: LOOP
      FETCH FROM cursor1 INTO namex, rollx;
      INSERT INTO HOME (name, roll) VALUE (namex, rollx);
    END LOOP;
    CLOSE cursor1;
  END;
//
CALL doWhile();


Monday, June 12, 2017

Laravel 5.X Authentication Custom User Providers

The custom provider let you make and bridge between your user custom authentication service and the Laravel functionality. It's easy to implement, below show full process step by step.

Stage 1: Create a User model class ->

At first you need to create a model class which will extend laravel custom model Illuminate\Foundation\Auth\User as below:

<?php
namespace App\Entity;

use Illuminate\Foundation\Auth\User as Authenticatable;

class User extends Authenticatable
{
    /**
     * The attributes that are assignable.
     */
    protected $fillable = [
        'first_name', 'last_name'
    ];

    /**
     * The attributes excluded from the model's JSON form.
     */
    protected $hidden = [
        'password', 'remember_token'
    ];
}


Stage 2: Create a CustomValidationProvider (Data Checker) class ->


<?php
namespace App\Authentication;

use Illuminate\Contracts\Auth\Authenticatable;
use Illuminate\Contracts\Auth\UserProvider;

class CustomValidationProvider implements UserProvider
{
    public function __construct($model)
    {
        $this->model = $model;
    }

    public function retrieveById($identifier)
    {
        /* Get by id */
        return $this->createModel()->newQuery()->find($identifier);
    }

    public function retrieveByToken($identifier, $token)
    {
        $model = $this->createModel();

        return $model->newQuery()
            ->where($model->getAuthIdentifierName(), $identifier)
            ->where($model->getRememberTokenName(), $token)
            ->first();
    }

    public function updateRememberToken(Authenticatable $user, $token)
    {
        $user->setRememberToken($token);
        $user->save();
    }

    public function retrieveByCredentials(array $credentials)
    {
        $query = $this->createModel()->newQuery();

        foreach ($credentials as $key => $value) {
            if (!contains($key, 'password')) {
                $query->where($key, $value);
            }
        }

        return $query->first();
    }

    public function validateCredentials(Authenticatable $user, array $credentials)
    {
        /* Match password here */
        return $user->getAuthPassword() == $credentials["password"];
    }

    public function createModel()
    {
        $class = '\\'.ltrim($this->model, '\\');
        return new $class;
    }

    static function contains($haystack, $needle)
    {
        return strpos($haystack, $needle) !== false;
    }
}

Don’t forget to register this service in your config/app.php file as below line:


'providers' => [
    App\Authentication\CustomAuthServiceProvider::class,
    ......
]

Stage 3: Register custom provider (Initialization of Provider) ->

<?php
namespace App\Authentication;

use Illuminate\Support\Facades\Auth;
use Illuminate\Support\ServiceProvider;

class CustomAuthServiceProvider extends ServiceProvider
{
    public function boot()
    {
        Auth::provider('custom_provider', function($app, array $config) {
            return new CustomValidationProvider($config['model']);
        });
    }

    public function register()
    {

    }
}

Stage 4: Update config to use new driver ->

Open up your config/auth.php file and scroll down to the "providers" section, and simply update the driver name as shown:


'providers' => [
    'users' => [
        'driver' => 'custom_provider',
        'model' => App\Entity\User::class,
    ]
]


Again, I can’t tell you how to implement these methods as it depends on how and where you’re storing your users, but as an example, you might inject an API provider via the constructor, and then make API calls to get user data, apply it to an instance of our user class, then return it.